How do I use the Head Cleaning utility in Mac OS X?
To clean the print head in the event of poor print quality, use the head cleaning utility in the Epson Printer Utility.
|
This process will require you to load several sheets of A4 plain bond paper into the printer, and will consume some ink from the cartridges. The amount used depends on the number of head cleans required.
|
Instructions:
-
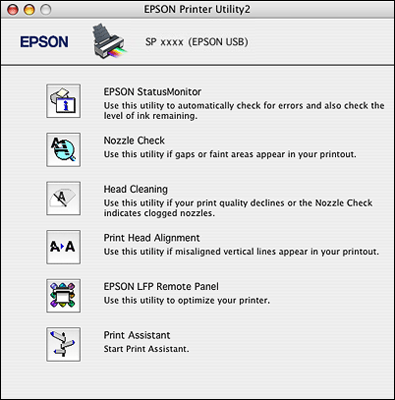
Open the Epson Printer Utility.
- Double-click the EPSON Printer Utility/ Utility2/ Utility3 icon in the Applications folder in Macintosh HD. If prompted, select the printer from the Printer List, then click OK.
-
Alternatively, open Print & Fax / Print & Scan / Printers & Scanners from System Preferences (10.9, 10.8, 10.7, 10.6, 10.5, 10.4, 10.3). For 10.2/10.1, open the Print Center from /Applications/Utilities. Double-click on the Epson printer icon in the list.
- For 10.2/10.1, click on the Configure icon. If prompted, select the printer from the Printer List, then click OK.
- For 10.5/10.4/10.3, click on the Utility icon.
- For 10.6/10.7/10.8, click on Printer Setup. A screen opens on the General tab, click on the Utility tab and then click on Open Printer Utility.
- For 10.9, click on Settings. A screen opens on the General tab, click on the Utility tab and then click on Open Printer Utility.
- For 10.10 and later, click on Options & Supplies. A screen opens on the General tab, click on the Utility tab and then click on Open Printer Utility.
- Make sure that several sheets of plain A4-size paper is loaded in the printer. First confirm if the print head needs to be cleaned. This saves ink. If you have already printed a nozzle check and confirmed that head cleans are required, move to step 6.
-
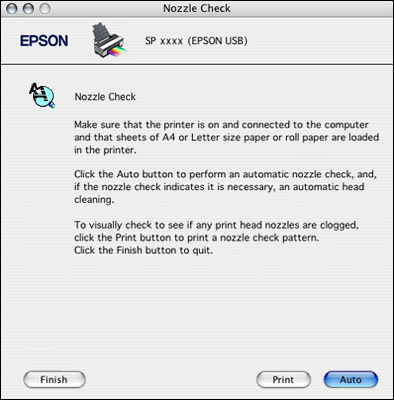
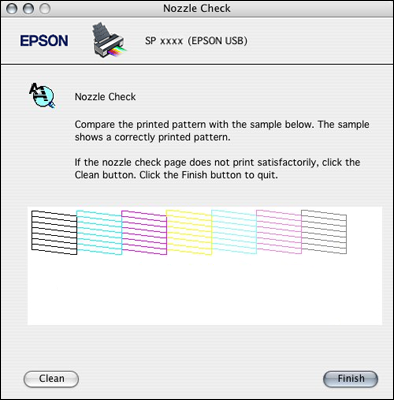
In the EPSON Printer Utility, click on Nozzle Check.
-
Follow the on-screen instructions to print a nozzle check.
-
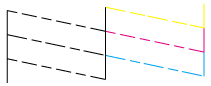
When the check has printed, compare the printout to the examples below:
Good nozzle check sample:
(print head does not need cleaning)Poor nozzle check sample
(print head needs to be cleaned)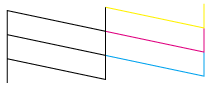
-
If there are breaks in the pattern, such as missing steps or lines/streaks (depending on the type of nozzle check pattern), or a missing colour, this indicates that the issue is related to the print head and/or ink cartridge. Click Clean to start the cleaning process. If you are not presented with the 'Clean' option after the nozzle check has printed, click on Head Cleaning from the EPSON Printer Utility window.
-
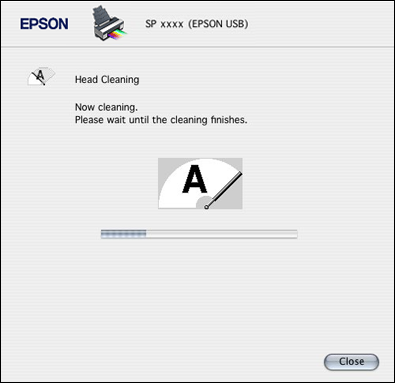
This will launch the utility. Click Start and wait for the printer to finish the first cleaning cycle.
-
When the Power light has stopped flashing, click Finish.
 Caution:
Never turn off the printer while the Power light is flashing. Doing so may damage the printer.
- Click the Confirmation button or select Nozzle Check from the menu and click Print. This procedure will confirm the effectiveness of the head clean.
-
The printer will print a nozzle check. Compare the print out with the next window. If there are gaps, the print out is faint, click Clean, and then Finish when the procedure is complete.
- If the nozzle check prints correctly (showing no breaks in the pattern), but the text is still broken you may need to run the Print Head Alignment utility.
- If the nozzle check pattern is complete with no gaps in the print, click Finish.
- If there are gaps or faint print on your printout click Clean.
If gaps are still present, perform another head clean (without printing a nozzle check between the cleans). Once the second clean is complete, power off the printer.
Wait one minute before powering it back on, then print a nozzle check. Compare the printout with the example window (above).
- If it is complete, click Finish.
- If there are gaps or faint print on your printout carry out another set of head cleans.
- We recommend only a maximum of six head cleans.
 Note:
Note:If gaps are still present in the nozzle check pattern, power off the printer and leave it for at least six hours (overnight is fine). After this period has passed, print another nozzle check.
- If the nozzle check pattern does not show improvement, then it is recommended that you install a new set of genuine Epson ink cartridges. <
- If only certain colours are affected, you could replace the associated cartridge.
- Replace any damaged or old cartridges - we recommend replacing cartridges that have been open for over 6 months (from the date the cartridge was first removed from its plastic vacuum packaging).
- If this fails to resolve the issue, please contact us to find out about the service and sales options we can offer you directly.