How do I use the Print Head Alignment utility in Mac OS X?
This article explains how to use the Head Alignment utility in Mac OS X.
It is recommended to use this utility to realign the print head if your printouts show broken text, with either misaligned vertical lines or horizontal banding.
|
If you have the an 'SX', 'BX', 'PX', 'S', or 'B' series product (e.g. SX200, SX405, B40W, PX700W, S20) do not follow this article. Instead you should consult the User Guide that came with your product where you will find instructions on using the Print Head Alignment utility. |
Instructions:
Before using the Head Alignment utility it is recommended that you run the Head Cleaning utility to confirm that the print head is performing at its optimum. For instructions on how to use the head cleaning utility, see the following Related Article: How to use the Head Cleaning utility in Mac OS X.
- Make sure that no error lights are flashing or on the printer control panel.
- Make sure A4 size plain paper is loaded in the sheet feeder.
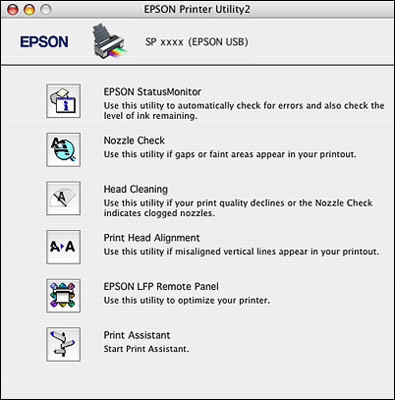
- Open the Epson Printer Utility.
- Double-click the EPSON Printer Utility icon in the Applications folder in Macintosh HD. Select the printer from the Printer List, then click OK.
- Alternatively, open Print & Fax from System Preferences (10.5, 10.4, 10.3) or the Print Center from /Applications/Utilities (10.2, 10.1). Double-click on the Epson printer icon in the list, then click on the Utility (10.5, 10.4, 10.3) or Configure (10.2, 10.1) icon. If prompted, select the printer from the Printer List, then click OK.
- In the EPSON Printer Utility, click on Print Head Alignment.
- Read the instruction, and then click Next.
- Click Print. An alignment sheet will be printed.
- Follow the on-screen instructions and check the alignment sheet.

In this example, the alignment pattern is a series of lines. The print head is correctly aligned when the lines that are printed are aligned to the centre position, in this case number 8.
Please note that the drop-down menus will always be set on a default value. Always read the instructions carefully and select the best match from the pull-down menus.
Find the most aligned pattern in each section (in the illustration above there is #1 and #2). If it is already the default value, shown on the pull-down menu, then the print head is already aligned correctly so click Next. If it is a different pattern, select the number of that pattern from the pull-down menu, and repeat this for each section. Then click Realignment. Continue to follow the on-screen instructions to complete the Print Head Alignment check.