Pro Displays: How do I replace a projector lens?
- EB-L1000U/1100U/1105U/1300U/1405U/1490U/1495U Series
- EB-L1500UH/1505UH/1710S/1715S/1750U/1755U Series
- EB-L12000Q/L20000U Series (TBC)
- EB-L25000U/30000U Series
Why does my projector have so many different lenses?
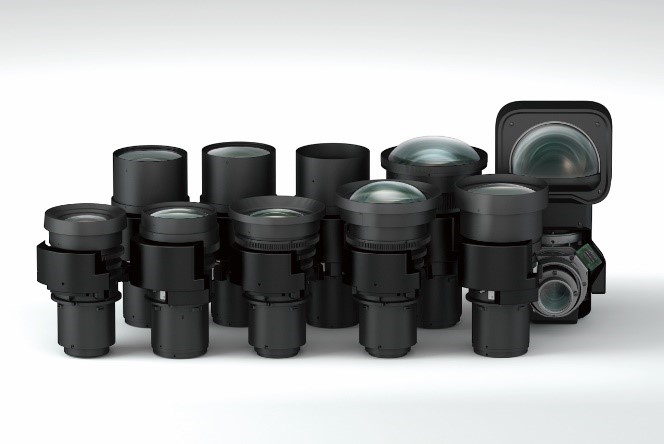 For the Professional Display series, it is important to have flexibility for installation or rental companies. EPSON provides a range of different type of lenses to suit almost every need, from long, middle to ultra-short throw.
EPSON provide calculators that can help with choosing the correct model and lens combination, see the following link for more information:
EPSON Throw Distance Calculator
https://support.epson-europe.com/TDS/#/
EPSON Lens Distance Calculator
Replacing a lens on the EB-L1000U - EB-L1755U Series
Standard Lens
Relates to
- ELPLM10 - Middle Throw 3
- ELPLM11 - Middle Throw 4
- ELPLM15 - Middle Throw
- ELPLW05 - Wide Zoom 1
- ELPLW06 - Wide Zoom 2
- ELPLW08 - Wide Throw
- ELPLU03 - Off Axis 1
- ELPLU04 - Off Axis 2
- ELPLL08 - Long Throw
Replacement Procedure:
|
Please ensure that the projector operates normally before replacing the lens and that the lens position has been reset! Failure to do so may result in an error sequence. |
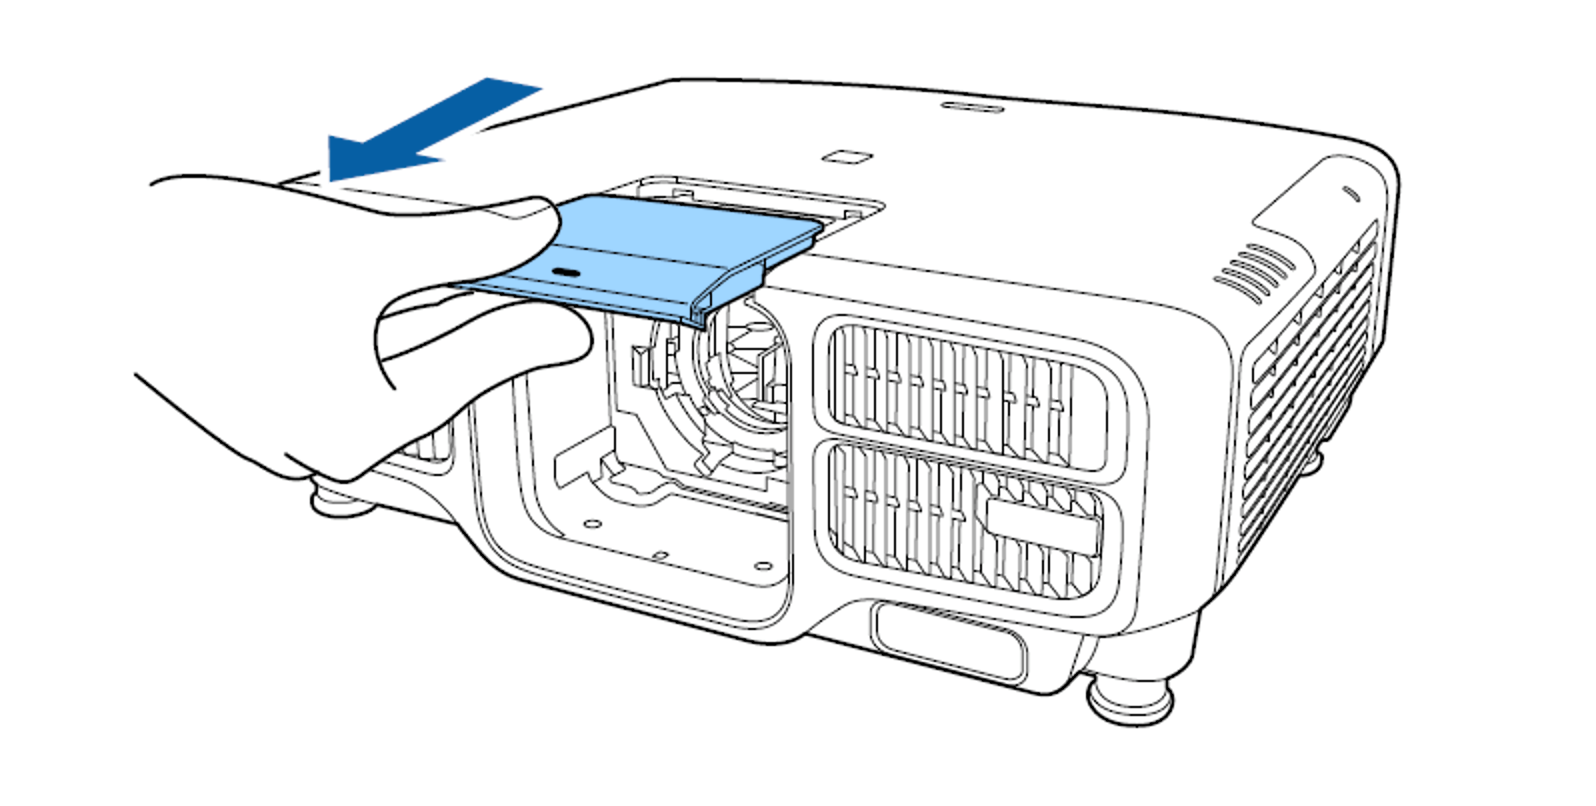
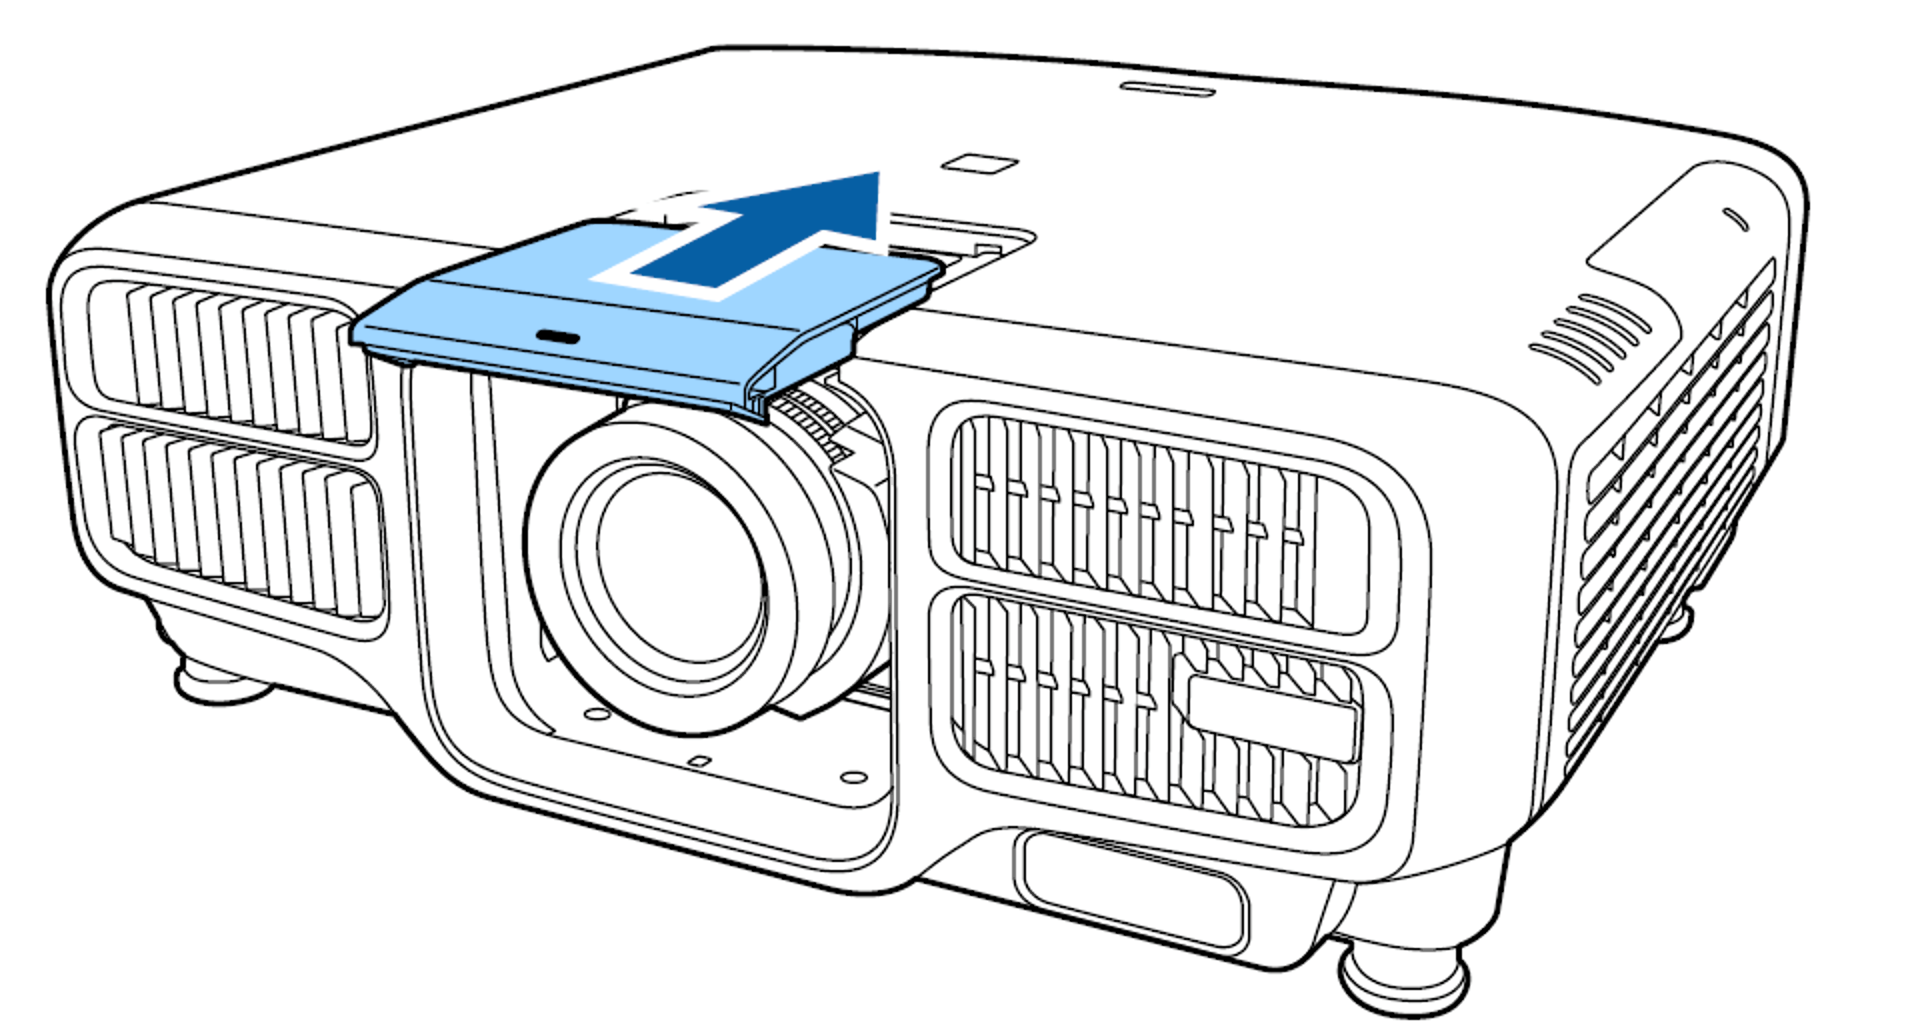
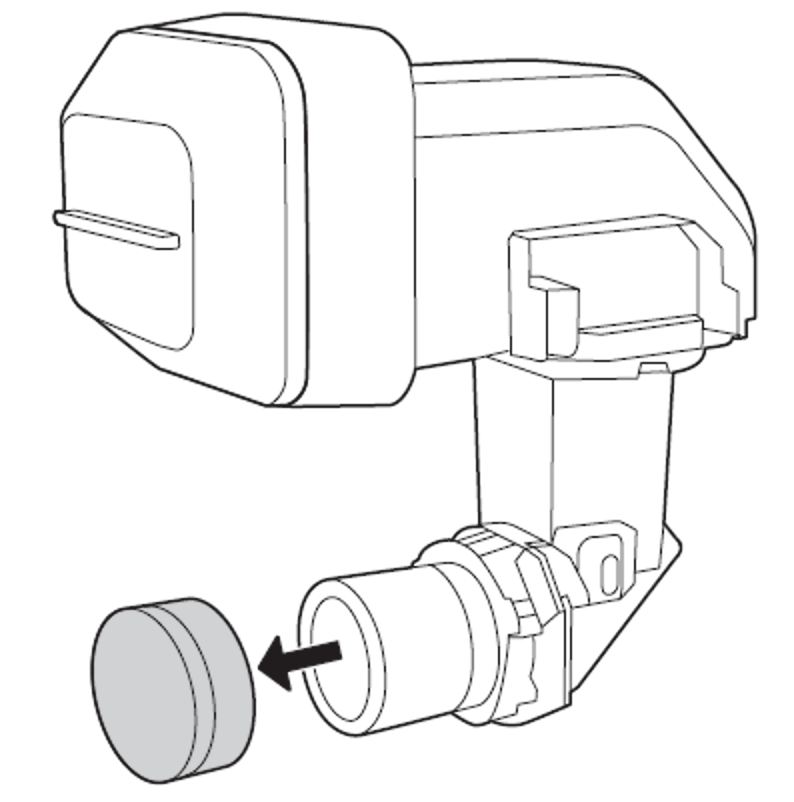
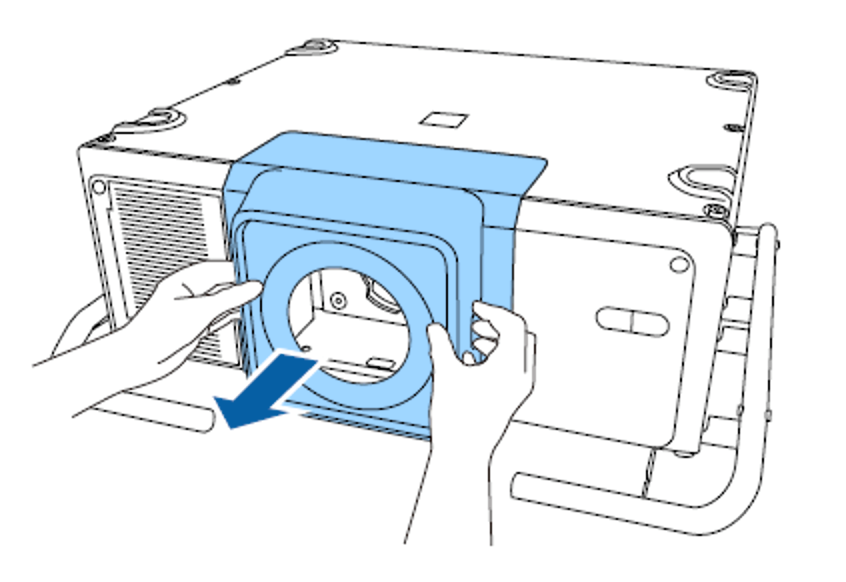
- Start with the projector powered OFF.
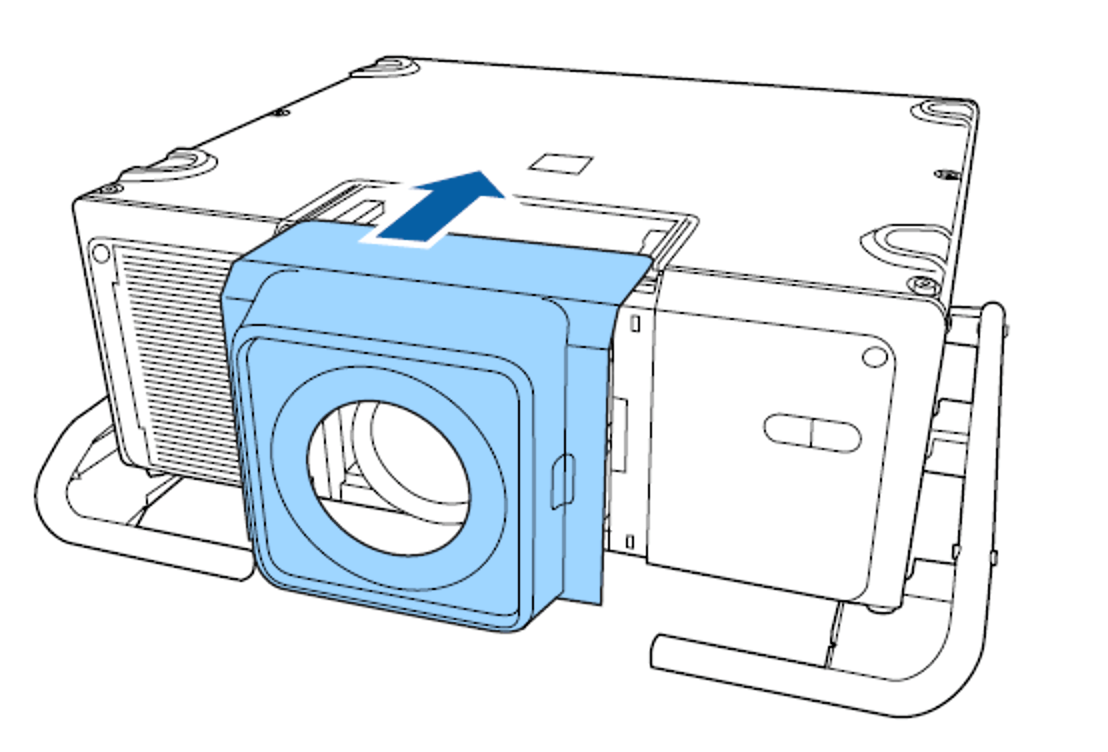
- Remove the lens cover.
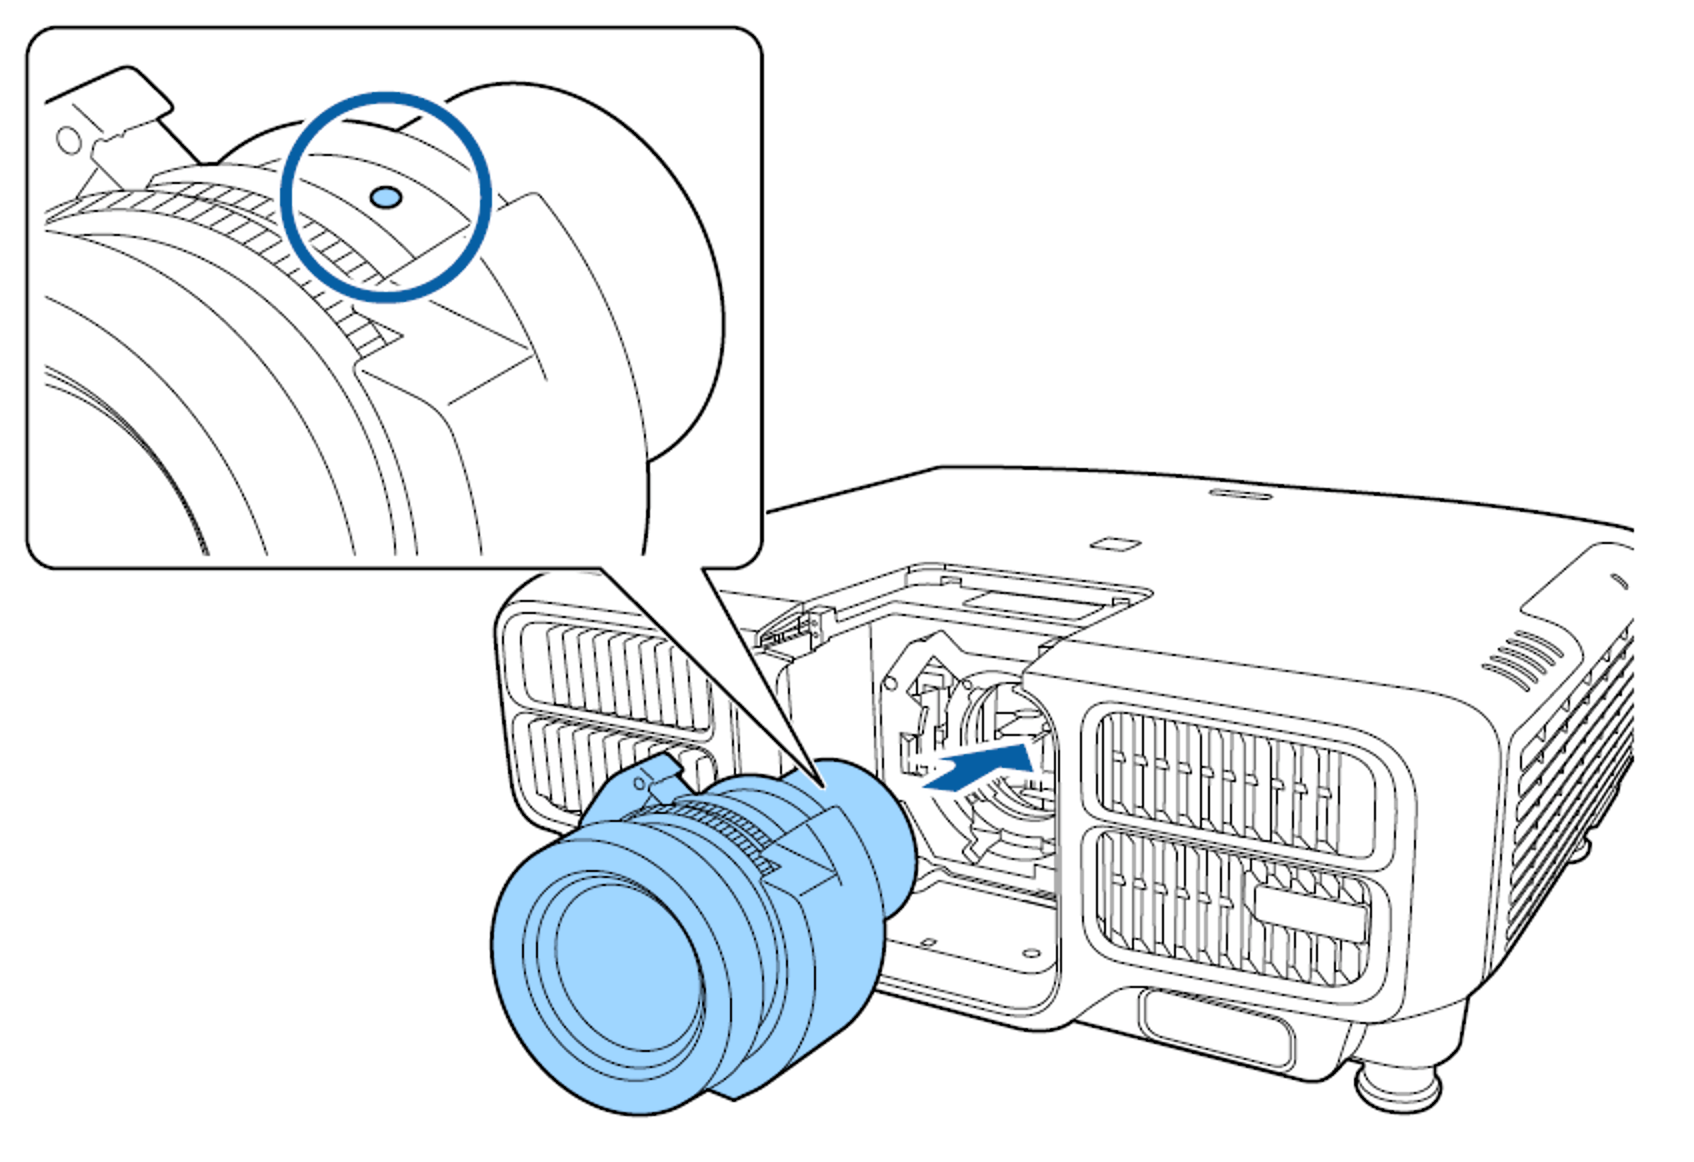
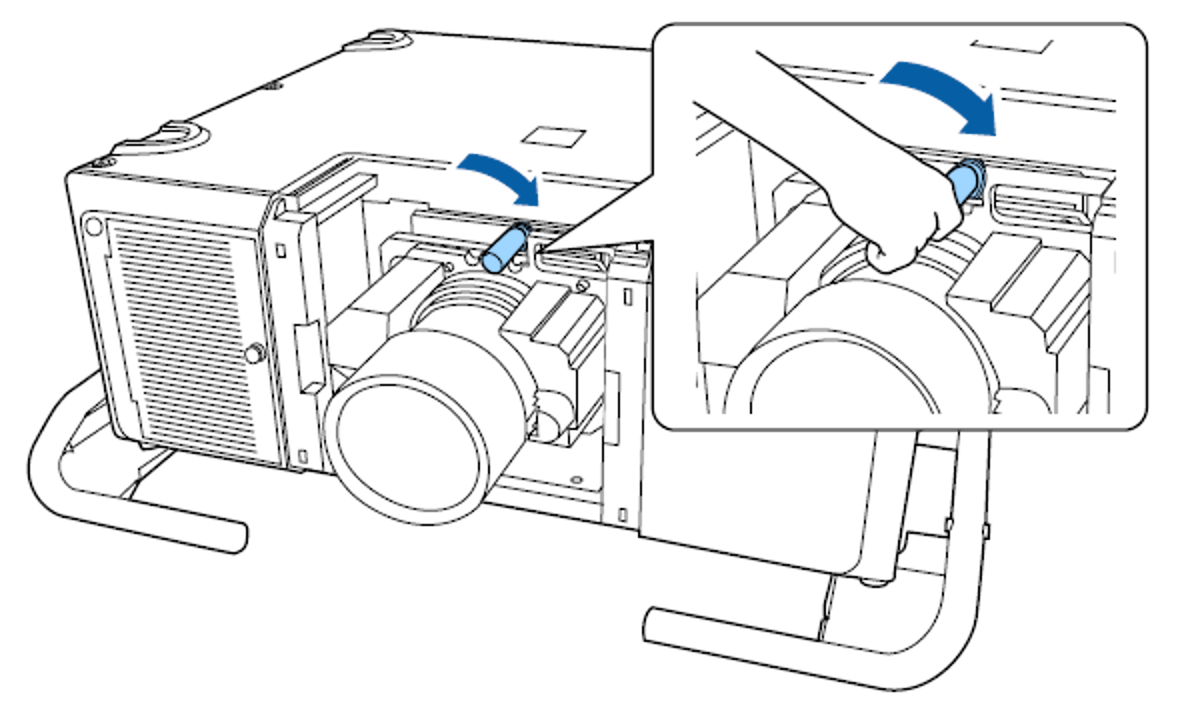
- Using the lens locking mechanism, release the lock on the currently installed lens and carefully remove it from the projector.

 Caution:
Seat the lens caps that are provided with the lens to minimalize any scratching or damage to the lens glass.
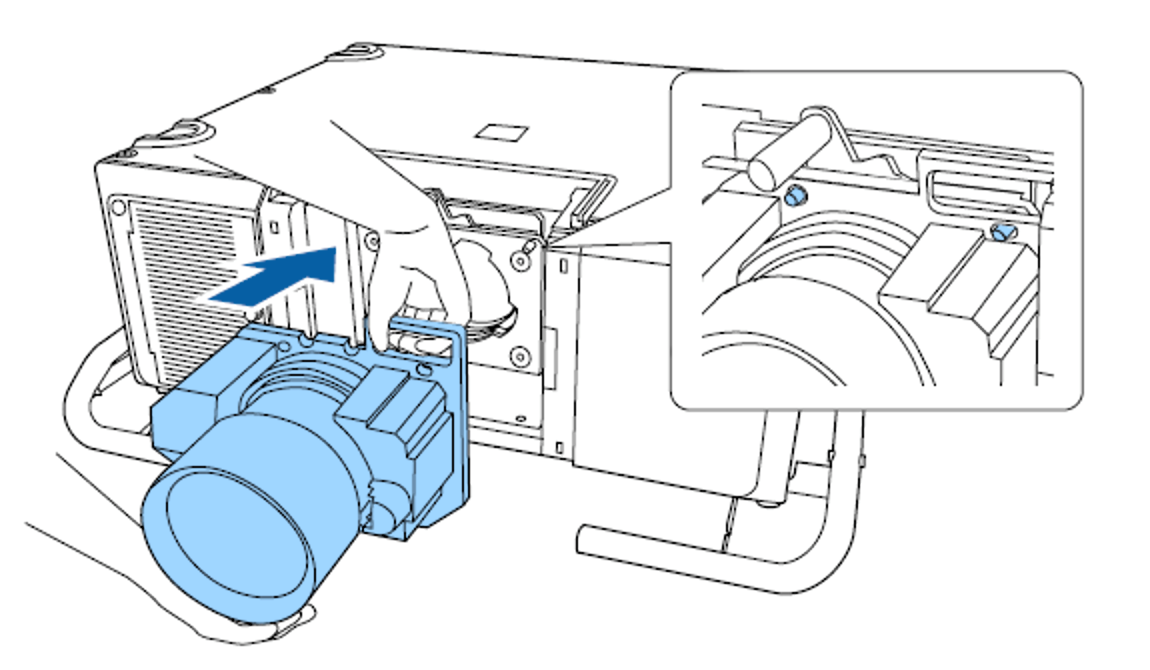
- With the replacement lens, remove the rear lens cap and any other packaging. Leave the front lens cap installed.
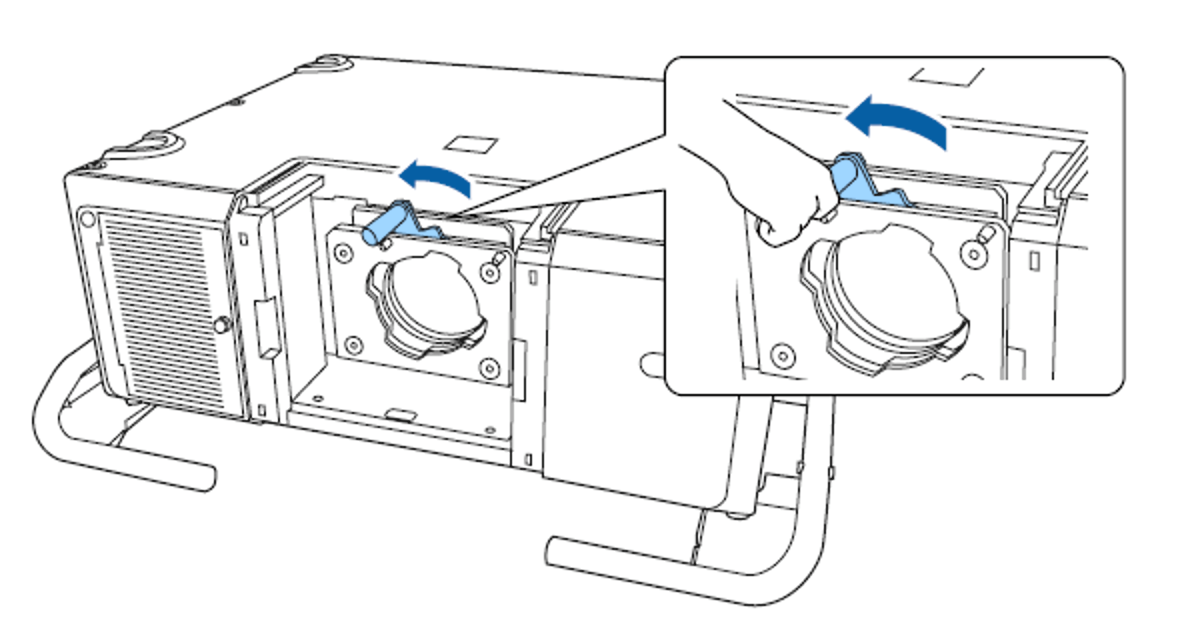
- Ensuring the lens locking mechanism is set to the unlock position, seat the lens inside the lens frame base.
- Whilst holding the front of the lens, move the locking mechanism into lock position.
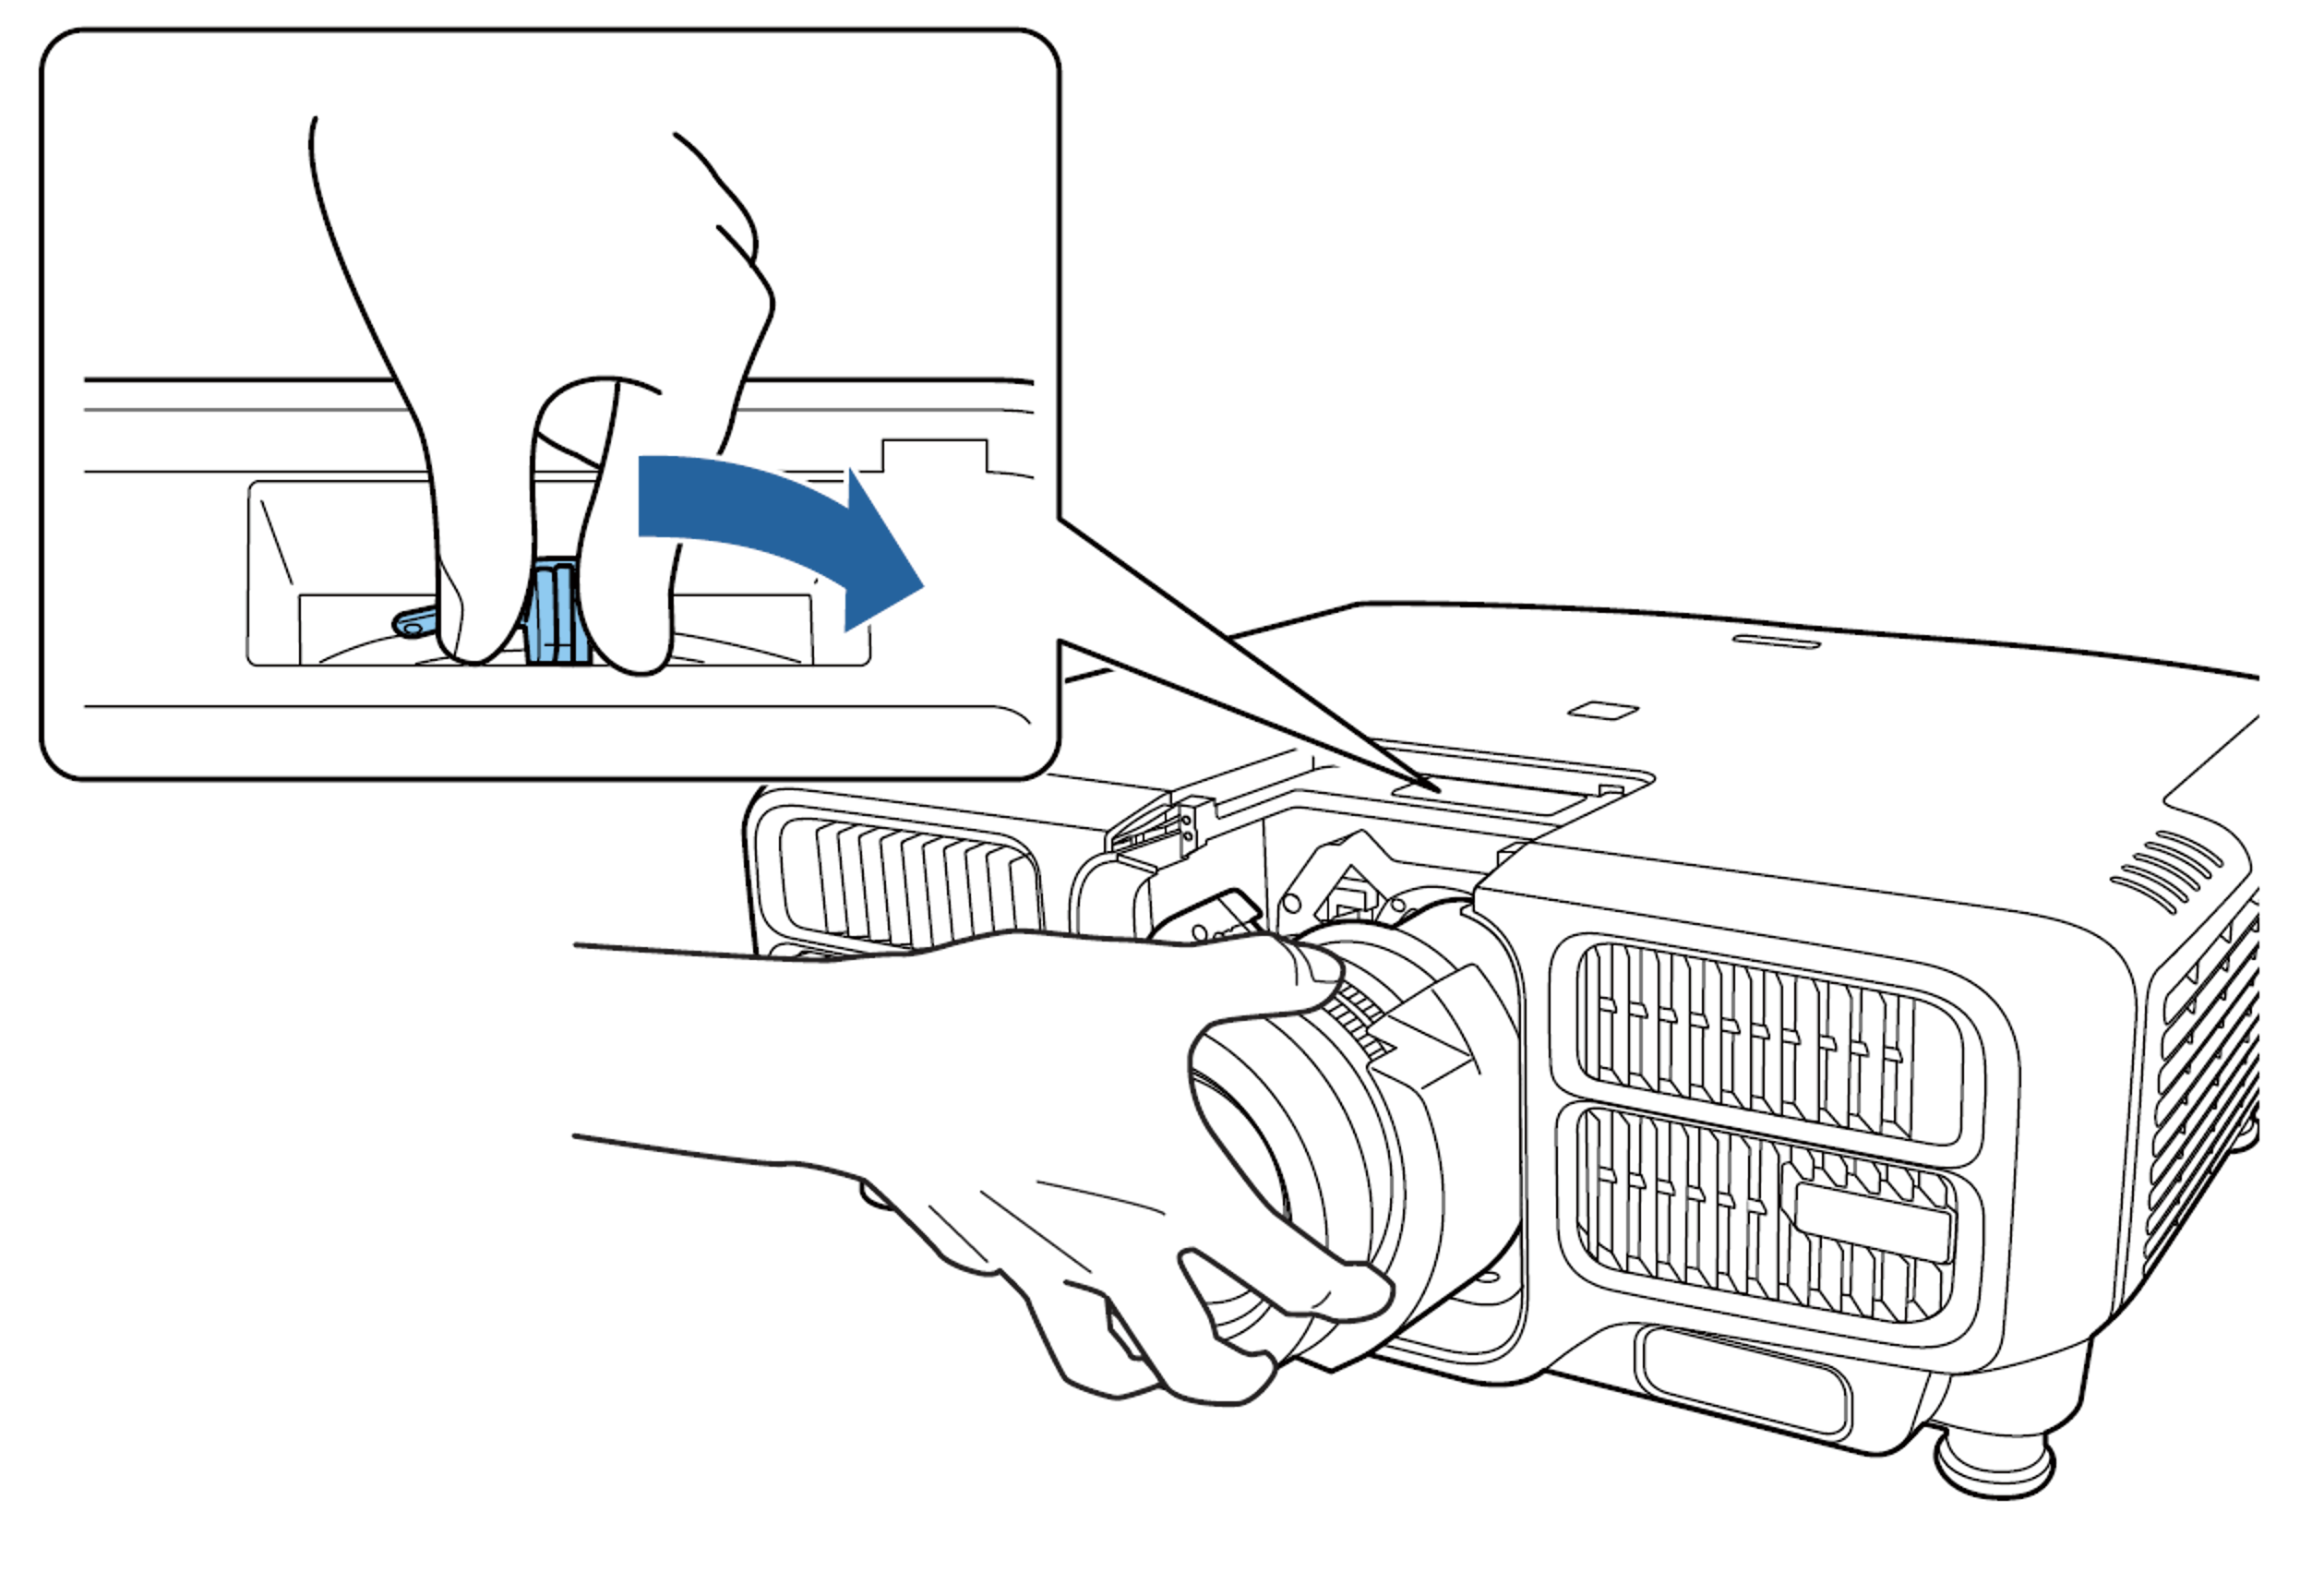
- Check the position of the lens to ensure it has been locked successfully, repeat steps 2-6 if this is not the case.
- Install the lens cover.
- Power the projector ON, the projector should prompt to run through a lens calibration to ensure a successful lens installation.

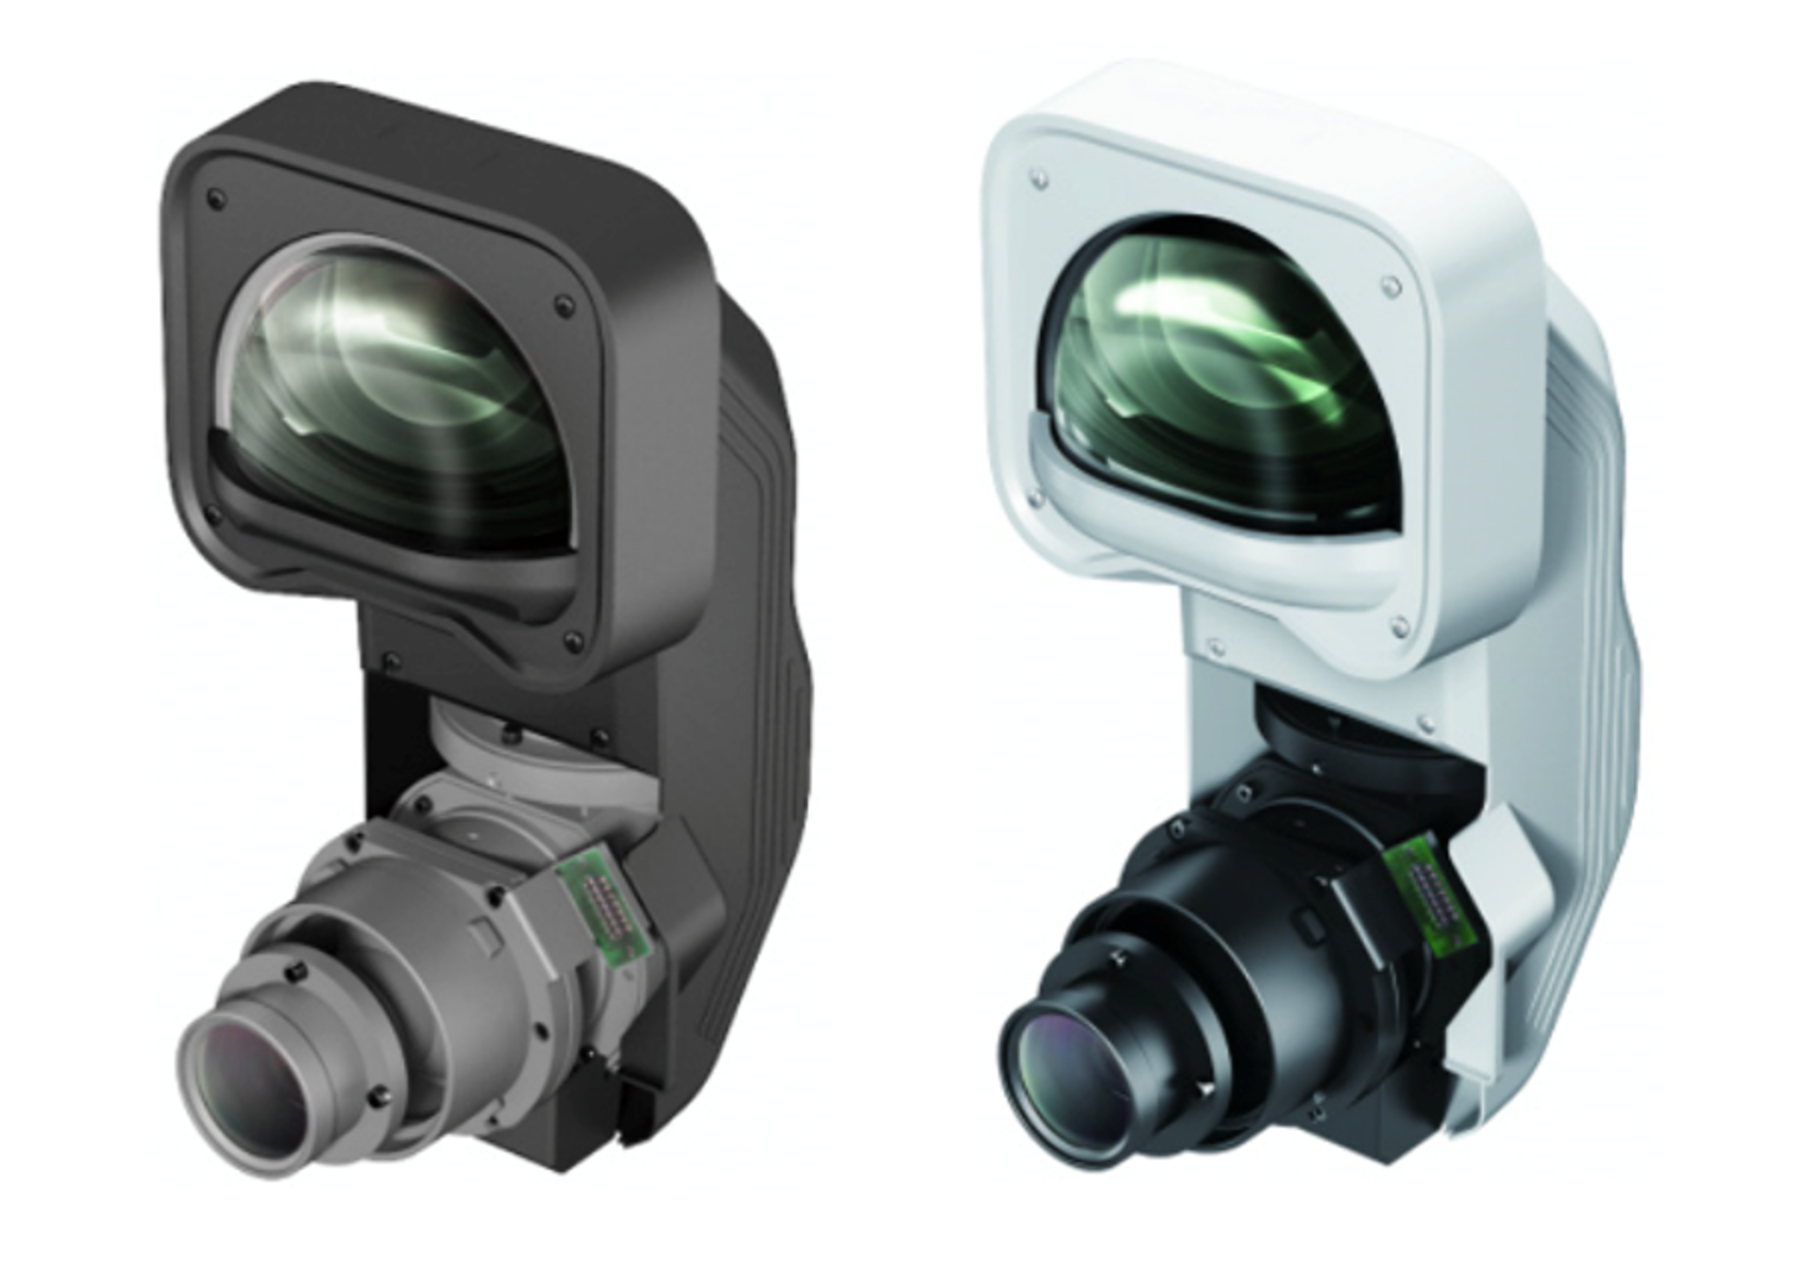
Ultra-Short Throw Lens ELPLX01
Relates to
- ELPLX01 (Black)
- ELPLX01W (White)
Ultra-short throw lenses are useful to project a large-scale image at a closer mounting distance.
Ensure the following instructions are followed accurately to avoid damage to the lens or projector.
Replacement Procedure:
- Start with the projector powered OFF.
- Remove the lens cover.
- Unlock the lens lock mechanism by turning it counterclockwise.
- Remove the small lens cap at the base of the ELPLX01 lens.
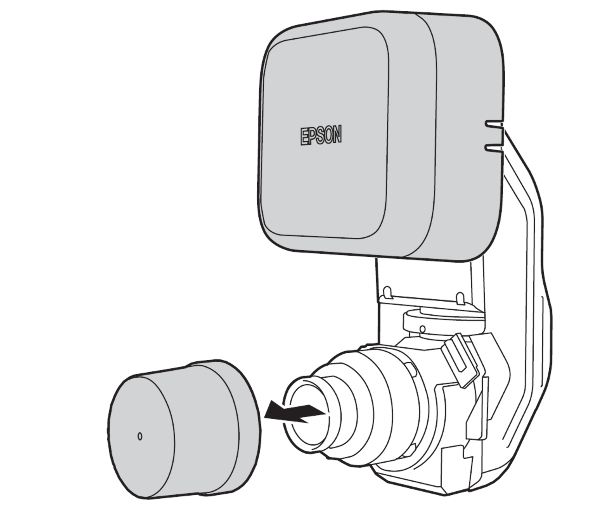
- Holding the lens firmly, install the ELPLX01 lens into the lens frame and then turn the lock mechanism clockwise.

- After securing the ELPLX01 lens unit into the projector, remove the large lens cap, power the projector ON and complete the Lens Calibration.
Important:
An error indication may be present after installing the ELPLX01 when powering the projector ON, this should disappear once the Lens Calibration has been completed successfully.
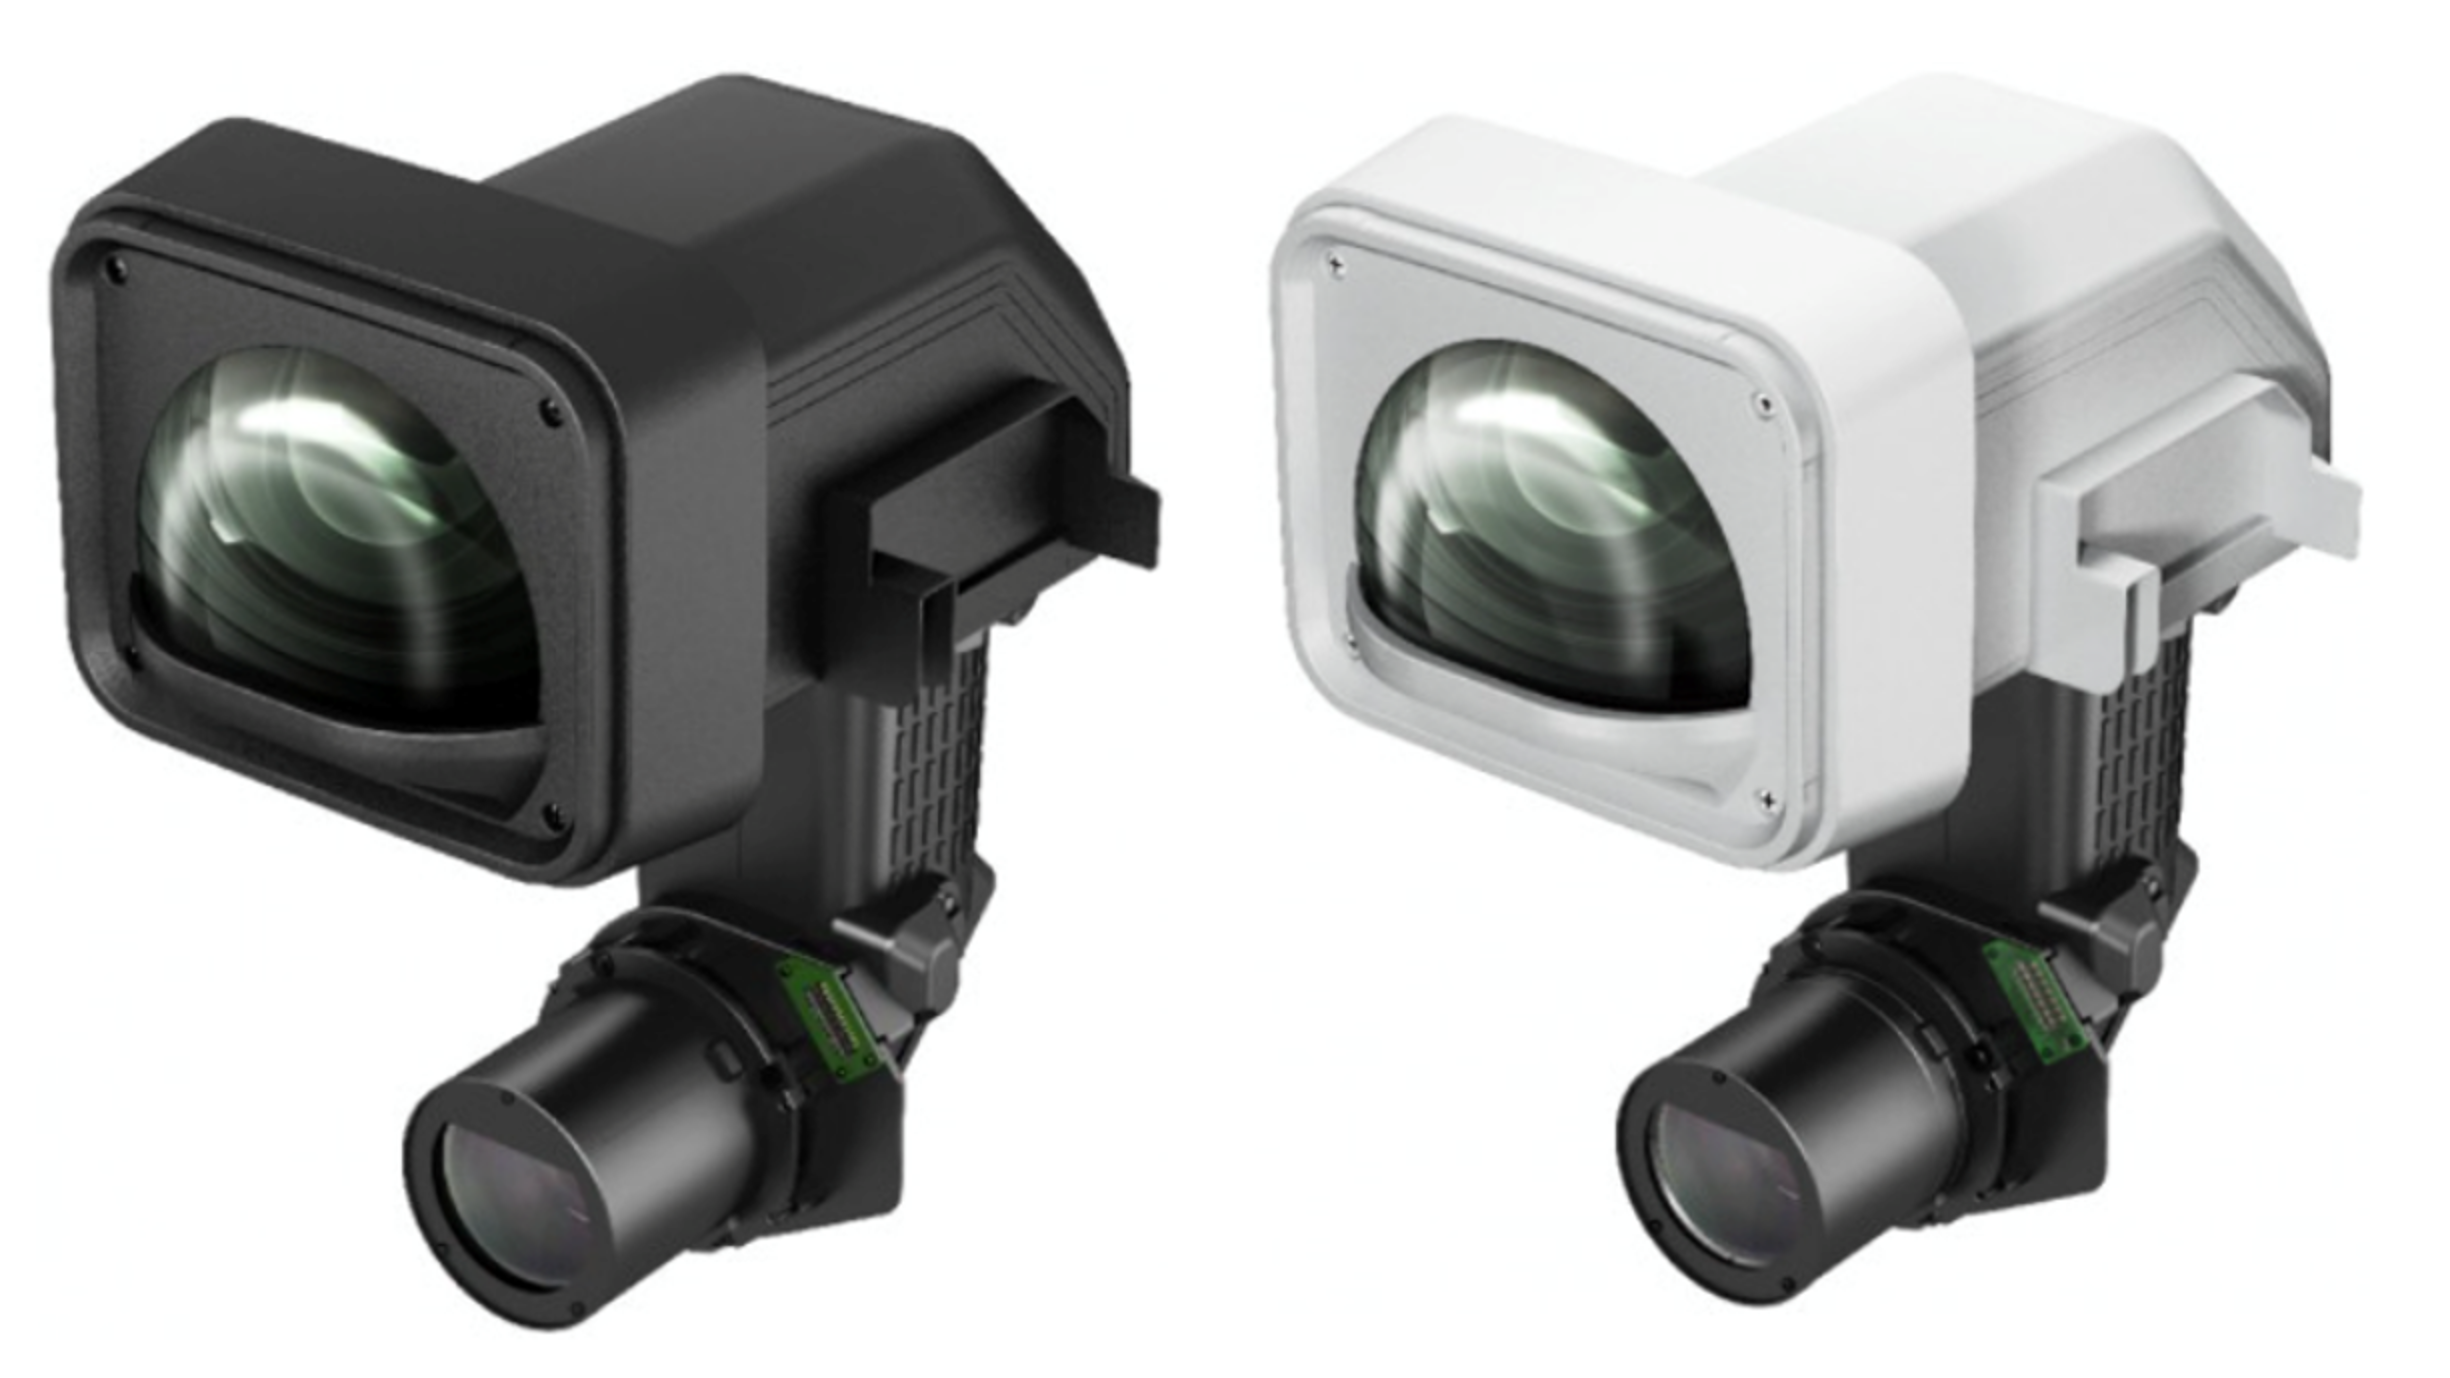
Ultra-Short Throw Lens ELPLX02
Relates to
- ELPLX02 (Black)
- ELPLX02W (White)
Ultra-short throw lenses are useful to project a large-scale image at a closer mounting distance.
Ensure the following instructions are followed accurately to avoid damage to the lens or projector.
Included Items:

|
A No.2 crosshead screwdriver is also required for attaching this lens. |
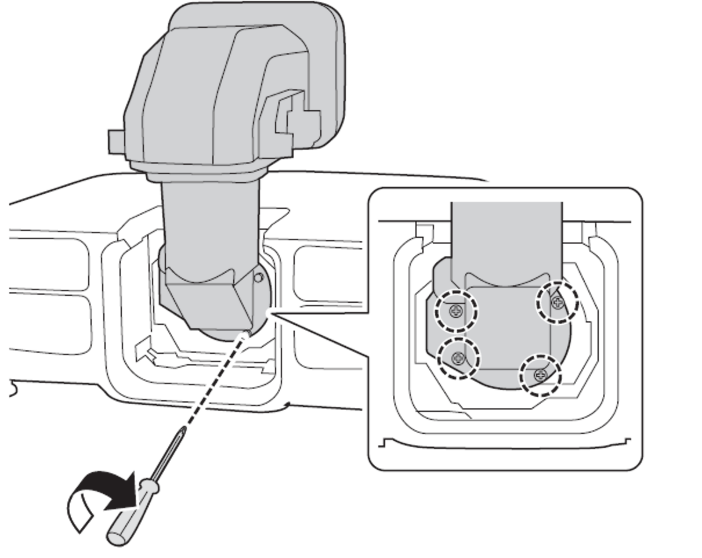
Replacement Procedure:
- Start with the projector powered OFF.
- Remove the lens cover from the projector.
- Unlock the lens lock mehanism by turning it counterclockwise.
- Remove the small lens cap at the base of the ELPLX02 lens.
- Holding the lens firmly, insert the lens unit into the projector, making sure that it is not incorrectly angled.

- While holding down the lens firmly, hold the lens lock lever and turn it clockwise to lock the lens unit.
 Caution!
Check that the lens cannot be detached. If it cannot be locked, the lens unit is at an angle. Remove and reinstall the lens unit.

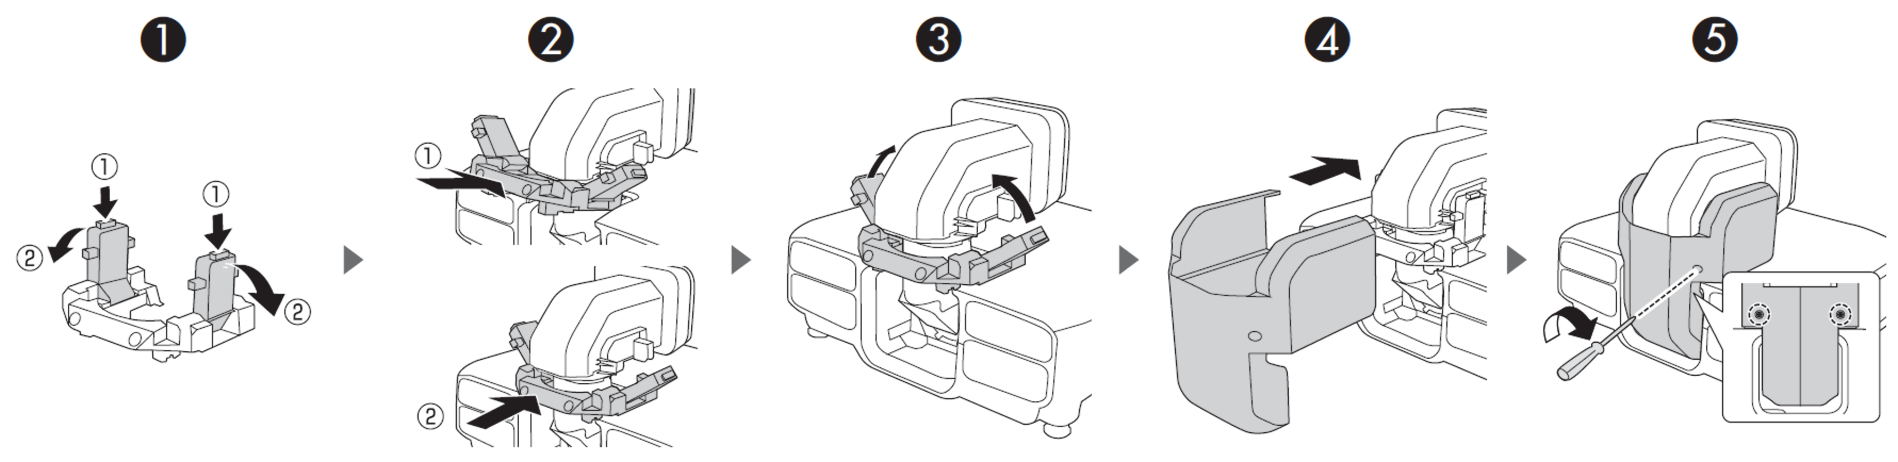
- Secure the lens unit using the 4x built-in M3 screws using a commerically available No.2 crosshead screwdriver.
- Attach the shock absorber unit and secure the decorative cover with the retaining screws.
- After securing the ELPLX02 lens unit into the projector, remove the large lens cap.
- Power the projector ON and complete the Lens Calibration.
Important:
An error indication may be present after installing the ELPLX02 when powering the projector ON, this should disappear once the Lens Calibration has been completed successfully.
Replacing a lens on the EB-L12000Q/L20000U Series
This area is intentionally blank and will be updated upon release of the product series.
Replacing a lens on the EB-L25000U/L30000U Series
Relates to
- ELPLL09 - Long Throw
- ELPLL10 - Long Throw
- ELPLM12 - Middle Throw
- ELPLM13 - Middle Throw
- ELPLM14 - Middle Throw
- ELPLR05 - Rear Throw Lens
- ELPLU05 - SHort Throw Lens
- ELPLW07 - Wide Throw Lens
|
Replacement Procedure:
- While pressing the tabs on both sides of the lens replacement cover, pull it towards you to remove it.
- Turn the lock lever counter-clockwise
- Insert the lens unit straight so that the protruding points on the lens fit through the holes (2 points) at the top of the lens unit.
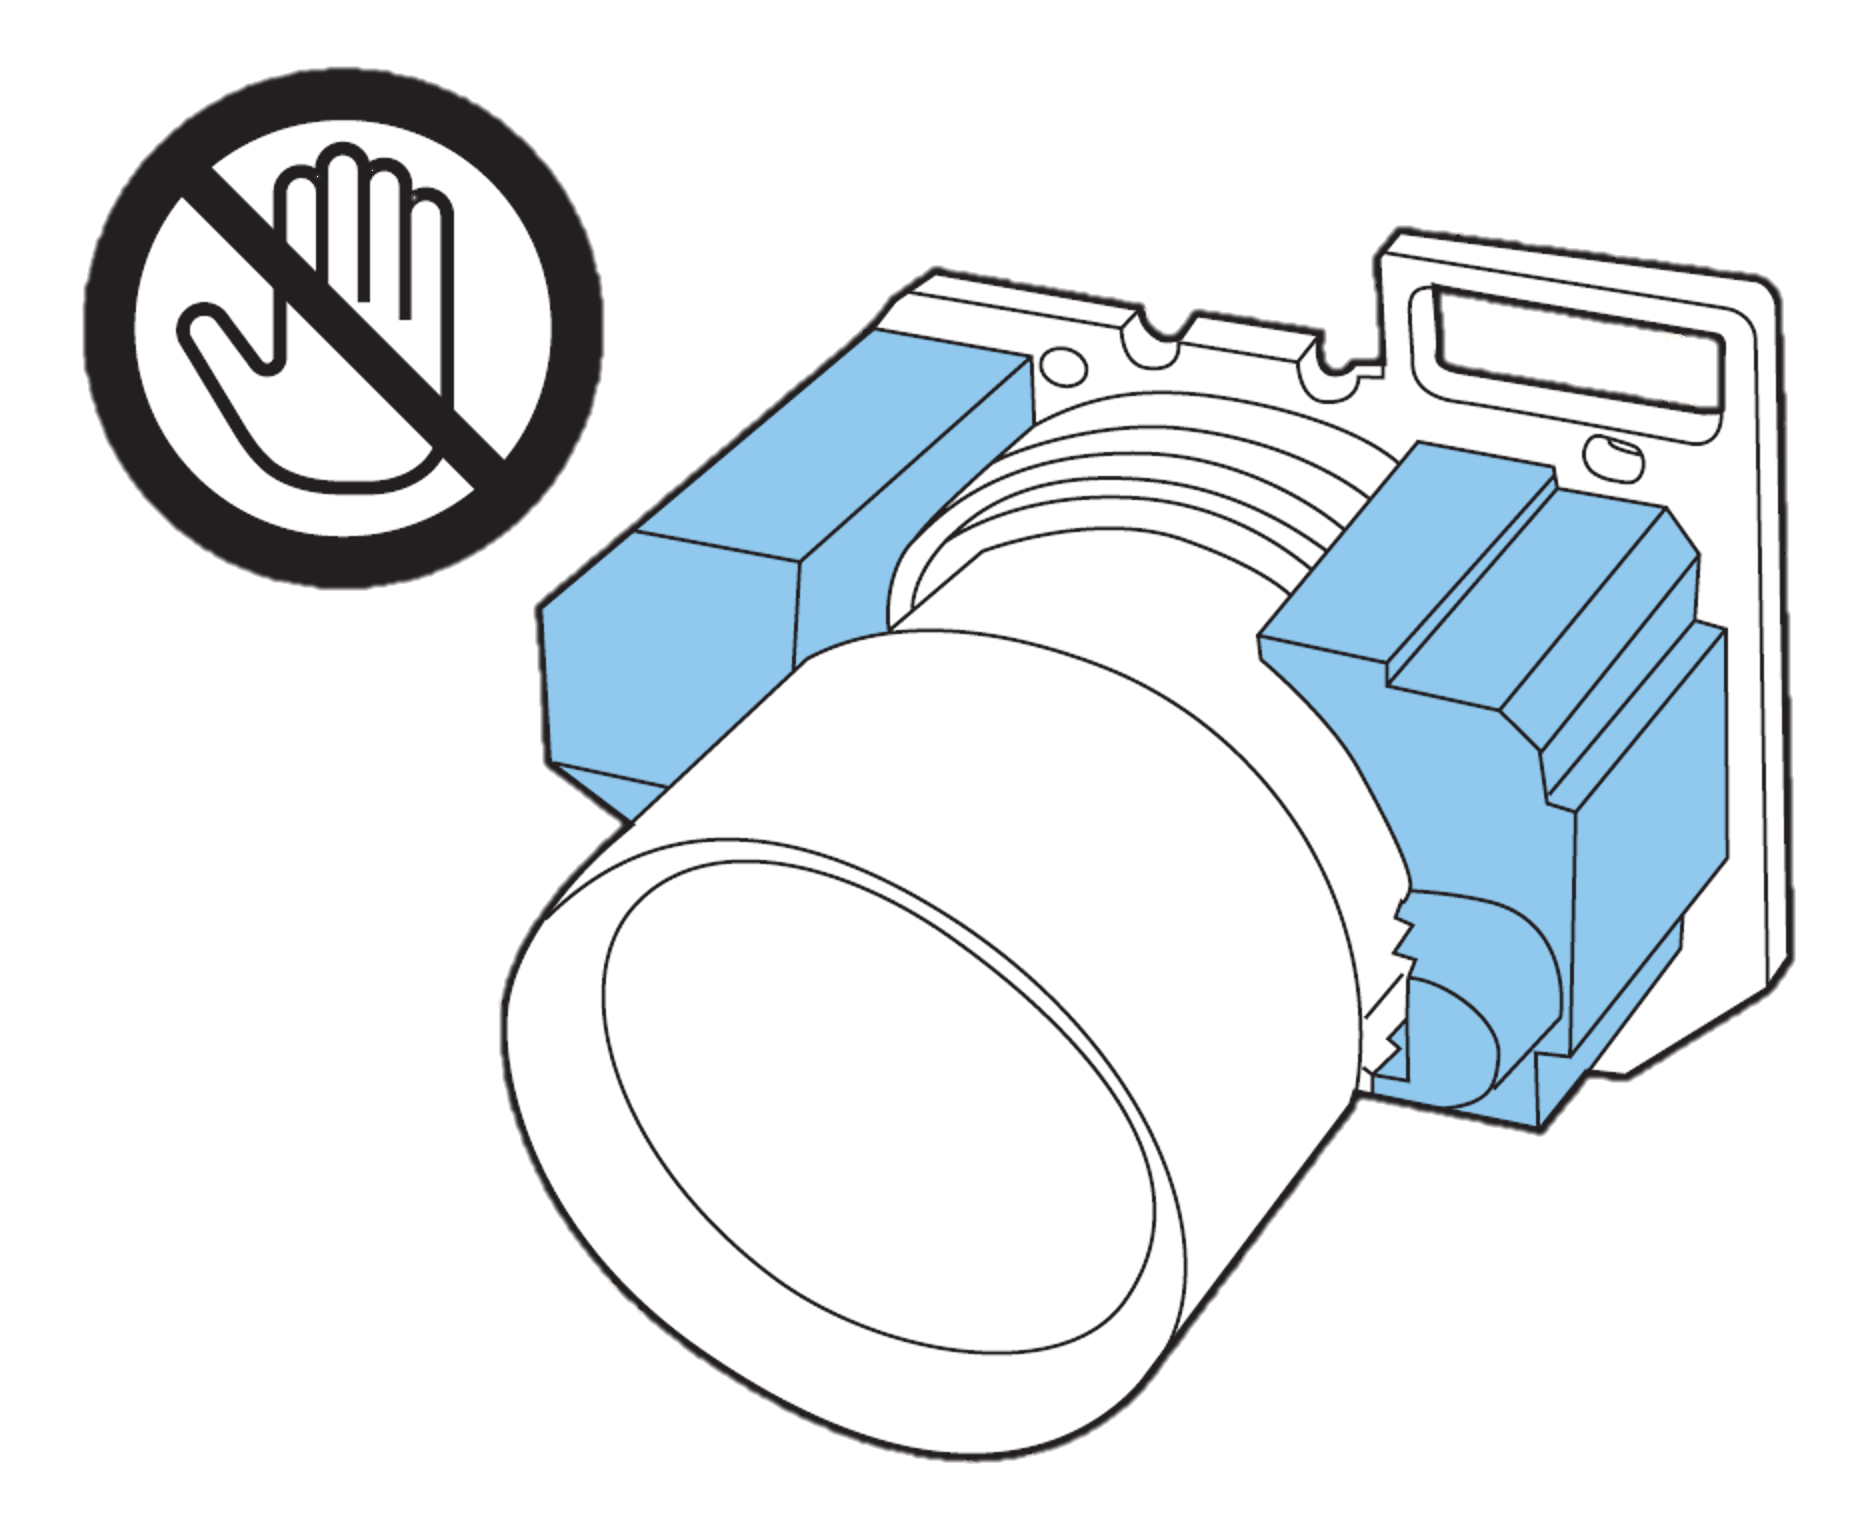
 Caution!
When attaching the lens unit, do not touch the motor covers shown in the following illustration (2 points), otherwise the lens may malfunction.
- While holding the lens unit firmly, hold the lock lever and turn it clockwise until you hear it lock onto the lens unit.
- Attach the lens replacement cover.
- Power the projector ON and complete the Lens Calibration.
Troubleshooting Projector Lens Installation
Lens Calibration Failed Error
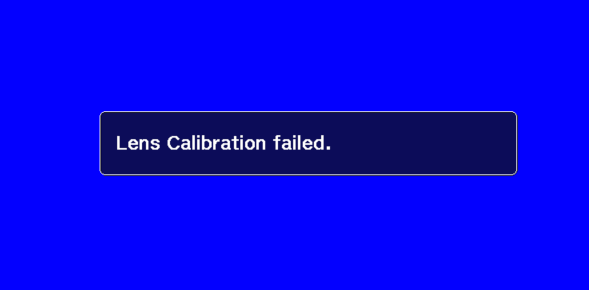
The projector will prompt to perform a Lens Calibration after a new lens has been installed (or when the Reset All (Factory Default) has been performed.
As seen in the 'replacing a lens' sections of this article, this process takes approximately 3 – 5 minutes to complete, the purpose of this calibration is to ensure that each minimum and maximum adjustment i.e. Focus, Zoom, Lens Shift can be performed without error.
If this message appears please power OFF the projector and remove the power cable, then follow these instructions:
- Whilst holding the lens, move the lens lock lever counterclockwise.
- Remove the lens from the lens frame and install the protective lens caps.
- Check the contacts within the lens frame, make sure these are clean and free of any damage (i.e. bent pins).
- Check the lens contact pins and ensure these are clean and free of any damage.
- Re-install the lens into the projector (using relevant steps mentioned previously in this article).
- If the issues persist, try an alternative lens.
'Maximum Brightness Level' Warning
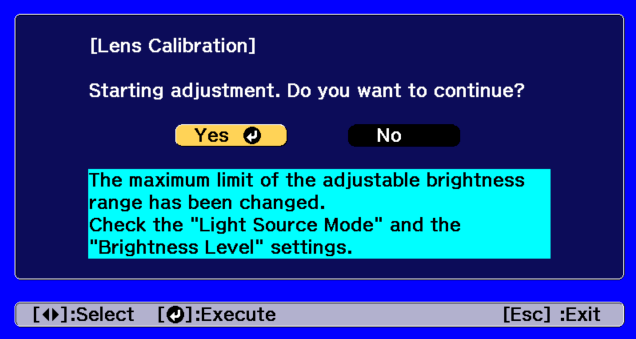
This message may appear after replacing the lens type, for instance to an Ultra-short-throw lens. This is normal operation depending on the combination of projector and lens configuration. The reason that this is in place is due to manufacturer recommendation of that lens type to ensure it is being used within specification, such as any safety or operational requirements.
'Lens Not Supported' Warning
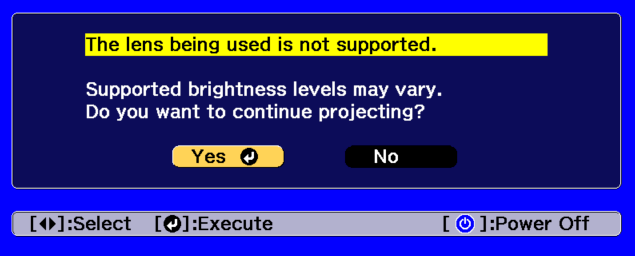
This warning will appear if the currently installed lens is not supported with the projector, please refer to the supported lens types within this article. If a supported lens is installed, follow the steps in order below:
- Remove and reinstall the projector lens, checking the lens contacts to ensure they are clean and free of any damage.
- Update the projectors firmware to the latest available version.
- Install an alternative lens.
- If the problem persists, contact the local service and support for your country.
 Note:
Note:The projector in this condition is still operational, please note it is important to use the correct projector and lens combination for the best results, using incorrect lens types may impair picture quality and overall experience.
Checking the Lens Status
You can also check the installed lens status, this is from the Info -> Projector Info menu
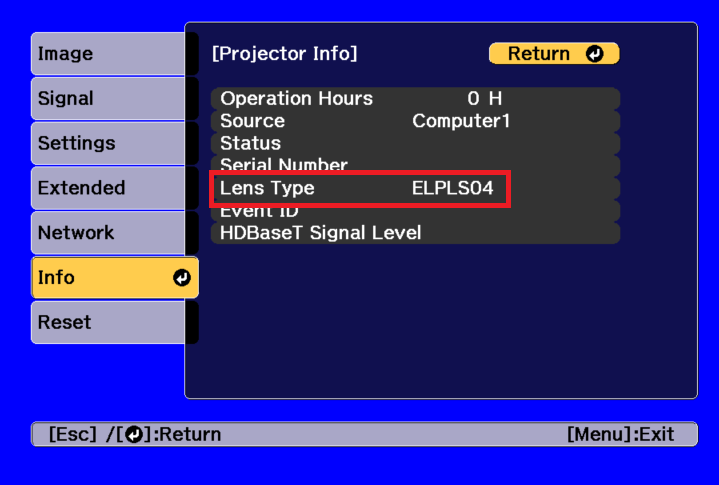
Certain lenses may require you to change the Lens type for the projector to function properly, this can be configured from the Extended -> Advanced -> Lens Type menu.

Transporting the Projector Lens
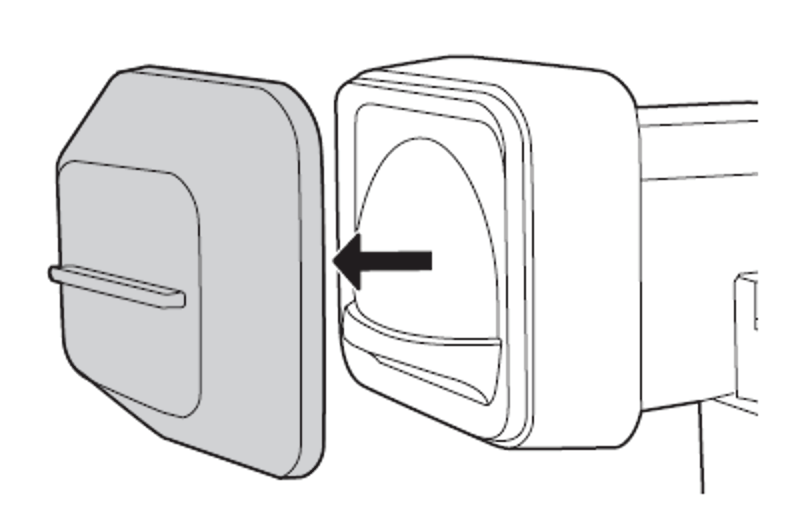
Please follow the recommendations as per the information document supplied with each lens.
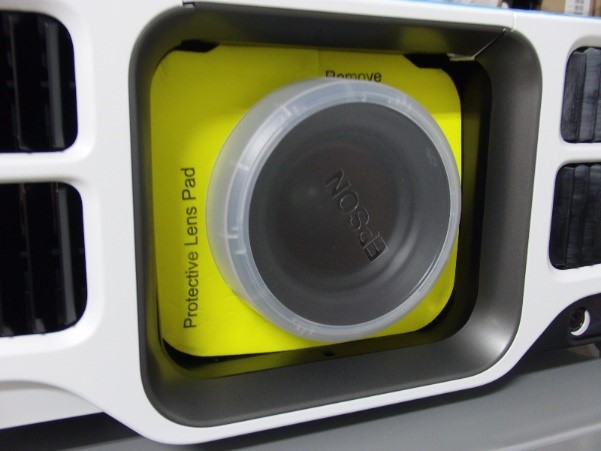
For the EB-L1000/1100/1300/1405/1505/1755U Series and the standard lens that is supplied with the projector, make sure to attach the protective lens pad and cover. This is only for the standard lens is that is supplied with this series of projector.
|
Do not transport the projector with any other optional lens type, this may result in damage to the projector or lens. |