Slow Scanning. What can I do to quicken up scanning?
If you use the default settings in Epson Scan or use the Full Auto mode to automatically detect the type of document you want to scan, it will automatically use standard settings which balances good quality with good scanning speeds. If you are trying to scan a standard document or want a quick scan of a photo, you may not require such a high resolution setting if you don't need the finest quality. By changing just a few settings the scanning time can be reduced whilst still retaining a good quality scan.
Open Epson Scan from your scanning application or independently from the desktop or applications/programs folder. If EPSON Scan starts scanning in the automatic mode, click on the Pause button during Preview and document type recognition.
- See How to perform a basic scan with EPSON Scan for help.
Click on the pull-down menu in the top-right corner of the EPSON Scan window and click on Home Mode. In the Home Mode window choose the appropriate Document Type from the drop-down menu.
Selecting the Scan Resolution
Check the Destination setting - this is where the resolution will be set. Make the selection as appropriate - Screen/Web (96-150 dpi), Printer (300 dpi), or Other (to specify the resolution).
Home mode:
Selecting the Scan Size
You can scan your images at their original size, or you can reduce or enlarge their size as you scan them. You do this using the Target Size setting in Home or Professional Mode. If you select a larger Target Size, this will increase the file size and may increase scanning time. If you want to scan at original size, leave the Target Size set to Original. Refer to your User's Guide for more information on making size and scaling settings.
Image Format settings
The Image Format selected in Epson Scan will also affect the size of the file and the overall scanning time. For example, selecting TIFF format is likely to result in a much larger file size. Selecting a format such as JPEG allows you to specify the compression level (the higher the compression level, the lower the quality).
To check these settings, open File Save Settings by clicking on the arrow button or ![]() folder button beside the Scan button. The File Save Settings window appears.
folder button beside the Scan button. The File Save Settings window appears.
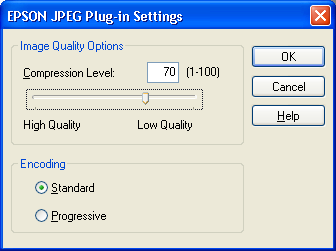
The default Image Format used by Epson Scan is JPEG (*.jpg) and the default Compression Level is '[16] (High Quality)'. Also, the PDF format has several different quality settings. You can make changes to the default settings by clicking on the Options... button.
For JPEG, you could try lowering the Compression Level, leaving the Encoding at Standard, and scanning again. Remember to change the Compression Level setting if you require best quality images when scanning in the future.
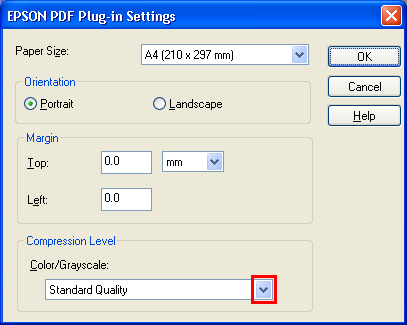
For PDF, you could try lowering the Compression Level quality depending on the project you're scanning and then scanning again. Documents containing images or commercially-printed material (e.g. brochures) may require a high quality setting, whereas documents containing little or no graphics may only require a standard or low quality setting.
You should find that both the scanning time and file size is reduced.
If scanning is slow, you could try changing the scanning software's Work Area to the root of the hard drive. The Work Area is the folder on the hard drive which stores temporary data when previewing and scanning. If set to a driver or partition which is already quite full, scanning times may be slower than a drive with lots of free space. In Windows, by default it is set to the 'Temp' folder which generally stores a lot of temporary data from other applications you may use on your computer.
In Epson TWAIN, you can access this setting by clicking on the Configuration button in the Preview window and then on the Other tab.
In Epson Scan, you can access this by clicking on the Configuration button in Professional Mode or Office Mode, and then on the Other tab.

System specification
In addition to scanning software settings, the specifications of your computer hardware can affect the performance of the scanner. For example, data transfer times will be quicker using a USB 2.0 port with an Epson scanner that conforms to the USB 2.0 specification. If you continue to experience scanning speed problems, we recommend the following:
- Check that your computer meets the minimum specifications required by the scanner. Refer to the product specifications and requirements in your User's Guide for more information.
- Make sure that your computer's Universal Serial Bus Host Controller drivers are up-to-date. Refer to the documentation provided with your computer or operating system or contact the hardware manufacturer for assistance.
- Try using an interface with a faster data transfer rate e.g. IEEE 1396 (FireWire) instead of USB 1.1, or USB 2.0 instead of IEEE 1396 (FireWire) or USB 1.1.
- If you are using the scanner over a network, scanning speeds may be affected by network traffic. You could try using the scanner via a direct wired connection.