Inkjet - Troubleshooting Paper Feed Problems
Explanation:
If paper will not load or it mis-feeds this can often be caused by using old, damaged or unsuitable paper or media. This can also occur if the printer's paper support is not used or the paper edge guide is in the incorrect position.
|
This article deals with paper feed problems for all A4 printers when using the Auto Sheet Feeder. For problems with roll paper please search the Epson Knowledge Base for a solution. |
Solution:
Select your product range from the below list:
XP Home, EcoTank (ET-2xxx) and L series printers
- If paper does not feed for printing, remove it. Then reload it in the sheet feeder against the right side and beneath the tab. Slide the edge guide against the edge of the paper, making sure that the paper stack is not above the arrow mark on the edge guide.
- If multiple pages feed at once, remove the paper, fan the edges to separate the sheets, and reload it.
- If paper jams when you load only one or two sheets, try loading more sheets at a time. Do not load more than the recommended number of sheets.
- If paper jams when you print on both sides of the paper, try loading fewer sheets.
- Make sure your paper meets the specifications for your product.
-
For best results, follow these guidelines:
- Use new, smooth, high-quality paper that is not curled, creased, old, too thin, or too thick.
- Load paper in the sheet feeder printable side up.
- Follow any special loading instructions that came with the paper.
XP Premium, XP Photo series
- Make sure the paper cassette is inserted all the way in the printer.
- If paper does not feed correctly, remove and reload it in the cassette and adjust the edge guides. Make sure the paper stack is not above the tab on the edge guides inside the cassette.
- If multiple pages feed at once, remove the paper, fan the edges to separate the sheets, and reload it.
- Do not load more than the recommended number of sheets.
- Make sure your paper meets the specifications for your product.
- If paper jams when you print on both sides of the paper, try loading fewer sheets.
-
For best results, follow these guidelines:
- Use new, smooth, high-quality paper that is not curled, creased, old, too thin, or too thick.
- Load paper in the cassette printable side down.
- Follow any special loading instructions that came with the paper.
WorkForce and EcoTank (ET-4xxx) series
Paper Jam problems inside the Product
If paper has jammed inside the product, follow the steps here to clear the jam.
- Cancel the print job, if necessary.
-
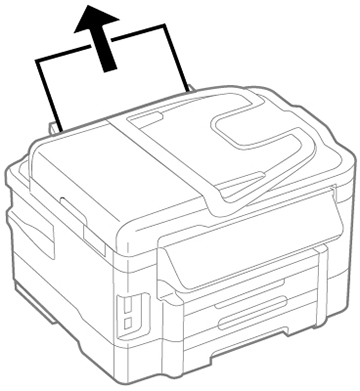
Remove any jammed paper from the rear paper feed slot.
-
Lift the scanner unit.

 Caution:
Do not touch the flat white cable inside the printer. Do not lift the scanner unit while the document cover is open.
-
Remove any paper inside, including torn pieces.


- Close the scanner unit.
- Follow the prompts on the LCD screen to clear any error messages. If you still see a paper jam message, check the other paper jam solutions.
Paper Jam problems in the Paper Cassette
If paper has jammed in a paper cassette, follow the steps here to clear the jam.
- Cancel the print job, if necessary.
-
Pull out the paper cassette, then carefully remove any jammed paper.

-
Carefully remove any paper jammed inside the product.

- Gently insert the paper cassette.
- Follow the prompts on the LCD screen to clear any error messages. If you still see a paper jam message, check the other paper jam solutions.
Duplex Units
If paper has jammed in the duplexer (rear cover), follow the steps here to clear the jam.
- Cancel the print job, if necessary.
-
Press the tabs and remove the duplexer (rear cover).

-
Carefully remove any jammed paper.

 Note:
Note:Do not touch the paper rollers.
-
Remove any jammed paper from the duplexer.

-
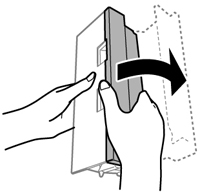
Open the duplexer.
-
Carefully remove any jammed paper stuck inside.

-
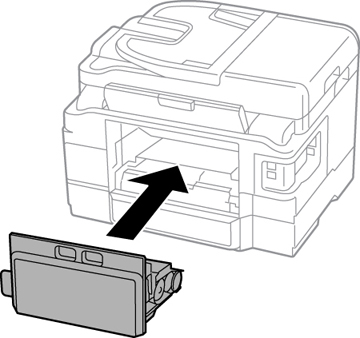
Reattach the duplexer.
- Follow the prompts on the LCD screen to clear any error messages. If you still see a paper jam message, check the other paper jam solutions.
Stylus C/D/R/S/CX/DX/RX/SX Series
-
Paper specifications.
The first thing to check is that the weight of the paper is within specification for the printer. The usual paper handling specifications for an Epson Stylus 'C' range and 'CX' range All-In-One printer is between 64 g/m2 and 90 g/m2 for cut sheet paper over 90 g/m2 genuine Epson paper only (255 g/m2).
The maximum weight is 300 g/m2 for the Stylus 'C48', 'D' range 'DX' and 'RX' range All-In-One printers. Non-Epson papers can cause paper feed issues, either due to the paper being too physically heavy for the paper feed mechanism, not feeding properly or due to the coatings some manufacturers use on their papers.
Click here for information on available Epson media and weights.
-
Check that an ink cartridge is not empty.
Paper will not load if any of the ink cartridges are empty or not recognised. A red (or amber) light will appear on the printer if there is a
 paper error and when an ink cartridge is empty or not recognised. Refer to your printer's user guide for further information.
 -
If the error relates to the
 paper feed:
Remove the stack of paper and try the following:
- Power
 off the printer and wait until no lights are displayed on the printer control panel and ensure the printer is on a level surface.
 - Remove any loaded paper and check the auto sheet feeder (paper path) for foreign objects and obstructions.
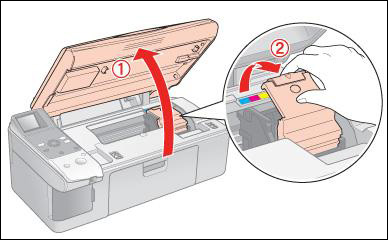
- Check under the printer cover and ensure that the cartridges are seated correctly and nothing is obstructing the ink cartidge holder.
-
Check for any bits of torn paper around the front of the printer and the ink cartridge holder.
- Ensure there are no blockages in the paper exit tray at the front of the printer.
-
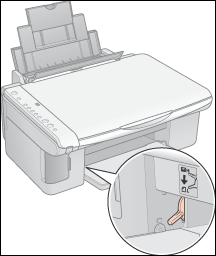
Some printers have a paper thickness lever for printing on envelopes. If your printer has a lever (such as C70, C80, DX4800), check that this is in the
 paper position. Please note, the paper thickness lever/envelope lever can be adjusted when using thicker or special media.
 Note:
Note:If your model of printer has a paper thickness lever it may be in a different position. Please check your user guide to find out where it is located.
- Power
-
Removing partially loaded paper.
-
Power
 off the printer and gently remove the paper. When the printer is powered off the paper may be ejected automatically.
 Caution:
Do not force the paper if it does not move. This may damage the auto sheet feeder and paper feed mechanism. Contact Epson for further support.
- Power
 the printer on and prepare to reload the paper properly.
 - Ensure the printer's rear paper support is attached and up - this supports the paper so it can be guided down to the rollers correctly.
-
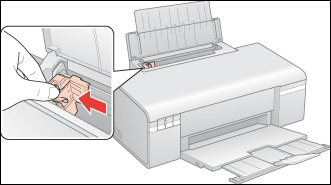
Pull the paper edge guide fully to the left before reloading the paper.
-
Power
-
Loading the paper:
- If the printer appears to be clear of obstructions, you could test the printer. Try loading paper again, we recommend using A4 plain bond paper (64 - 90 g/m2) to test the printer. Follow the loading instructions given below:
- Fan the edges of the paper and tap the stack on a flat surface, then load the paper.
-
Ensure the paper is placed correctly, square against the right hand side of the printer.
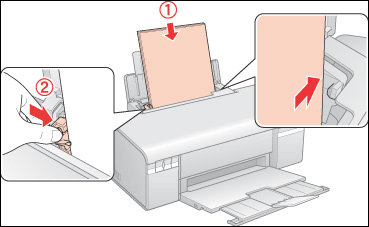
- Pull the left paper edge guide across to the left side of the paper. Ensure it makes contact with the paper as this helps to guide the paper correctly.
- Ensure the paper is not loaded higher than the triangular load-limit mark on the
 edge guide. The paper fits under the tabs inside the edge guides and you have not loaded paper too far into the printer.
 - Make sure that the number of sheets in the paper stack does not exceed the limit specified for the media.
When loading check the following:
- The paper is not curled, creased or too old.
- Always load paper into the sheet feeder short edge first, even when you are printing landscape-oriented pictures.
- Paper is not jammed inside the printer and remove any jammed paper.
- Special loading instructions that came with your paper have been followed.
- If paper jams frequently, we recommend changing the paper for a higher quality plain bond paper, or for special/thicker media change to supported Epson media.
-
Once these checks have been carried out, test the printer's manual feed function.
-
If the paper weight is within the specification of the unit then
 power the printer on and press the
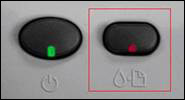
  Paper/Maintenance button to see if paper will load. Press it again to eject the loaded paper.
 Note:
Note:If you are using an All-In-One try to carry out a photocopy using one of the copy buttons or a printer operation check to check the paper load function. See your product's User Guide for help.
An example of the button to press is given below:
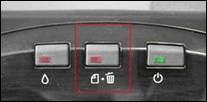
- If the
 Paper Out light is flashing, or Paper feed error on your LCD panel,
  power the printer off.
 - Reload the paper,
 power the printer back on, and press the
  Paper/Maintenance or Copy button again to see if the printer will now successfully load the paper.
 - Paper will often not feed if the rear paper support is not in use. It can also occur if the paper edge guide is not pulled up against the paper. This may be overlooked however it should always be used so it guides the paper so it is loaded perpendicular to the paper feed rollers.
-
Pull the paper edge guide up against the side of the paper.

- The paper edge guide should not pinch the paper, but it should make contact with it. If paper continues to fail to load, contact Epson for support.
-
If the paper weight is within the specification of the unit then
-
If there is a history of paper not feeding:
The media you are using may be unsuitable, old or damaged. Ensure that paper is stored correctly and in a dry, cool place. Humid or damp conditions can effect paper and subsequently the printer's ability to grip and feed the paper.
If you are still experiencing problems with plain paper then we recommend trying a better quality paper. Refer to step 1: Paper specifications for information. Click here for information on available Epson media and weights.
 Note:
Note:Paper should be stored in a cool, dry place and in the original packet if suitable. Epson media is packaged in an inner plastic packet inside the main packaging to protect it.
