I've installed the Windows 7 driver for my printer/scanner. Every feature works except Scan to PC or Scan to Email. What should I do?
- These Epson All-In-Ones:
- Stylus SX110/SX115, Stylus SX210/SX215, Stylus SX218, Stylus SX420W/SX425W, Stylus SX525WD, Stylus SX510W/SX515W, Stylus SX610FW, SX620FW
- Stylus Office BX310FN, Stylus Office BX320FW, Stylus Office BX525WD, Stylus Office BX600FW, Stylus Office BX610FW, Stylus Office BX625FWD
- Stylus Photo PX650, Stylus Photo PX700W, Stylus Photo PX710W, Stylus Photo PX800FW, Stylus Photo PX810FW
- These Epson Scanners: Perfection V600
You may be experiencing issues with the Scan to E-mail or other Scan to PC functions for one of several reasons. Perform the following checks to resolve the issue. You could try scanning using the scanner button(s) after each check if you wish, or complete all checks before trying to scan again.
Make sure the product is powered on. If your product is connected to the computer via a USB cable connection, check that the cable is connected to the product's USB port and a USB port on the computer.
- Check that you can use EPSON Scan independent of any other software
If scanning is possible, this should rule out both a hardware and a communication issue. Open EPSON Scan from the Desktop shortcut or from start > All Programs > EPSON Scan > EPSON Scan.
If EPSON Scan appears without displaying an error, then the driver is installed correctly. Move to the next step.
If you see the error "EPSON Scan cannot be started" then follow the advice below:
- Products connected to the computer via a USB connection: The driver is not installed correctly. See the following article to resolve the issue and then return to this article if required: When I try to scan, I see the error message "EPSON Scan cannot be started" in Windows. What can I do?
- Network-capable All-In-Ones connected via a wired (Ethernet) or wireless network: There may be a network communication error. Continue following this article, paying particular attention to step 5. Networked All-In-Ones.
- Update EPSON Event Manager
Update the Event Manager software for your product. Follow these steps to download and install the software:
- Go to your local Epson support website.
- Select your product and open the Drivers & Software section.
- Download and install EPSON Event Manager software version 2.30.01 or later.
- After installing the software, restart the computer. This will finish the installation and the Event Manager icon should be visible in the system tray once Windows has started.
 Note:
Note:Stylus Photo PX710W/ PX810FW and models released after June 1st 2010: You do not need to update EPSON Event Manager to support Windows 7. The EPSON Event Manager software that comes with these All-In-One products is a compatible version. However, where a later version is available, we recommend installing and using the latest version.
- Make sure that the EPSON Event Manager icon is displayed in the Windows system tray
To use the Scan to PC function(s), EPSON Event Manager needs to be ready to scan. Check if the Event Manager icon is showing in the notification area of the Windows taskbar/system tray.
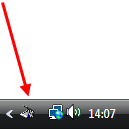
If it is not displayed: The Windows taskbar has a setting that allows you to hide inactive icons to help keep the notification area uncluttered by hiding icons that you have not clicked recently.
- Open EPSON Event Manager from the
 shortcut icon the Desktop (or All Programs/Programs in the start menu).
- Now check if the icon is displayed in the notification area of the taskbar. If it's displayed, try using the Scan to PC feature(s) again.
- If it's not displayed, right-click on the notification area (near the clock) and select Properties. If Hide inactive icons is ticked, either un-tick it to show all icons or click on Customize and set the EPSON Event Manager icon to 'Always show'.
- Open EPSON Event Manager from the
- Make sure that a supported email client is installed
Windows 7 does not come with preinstalled email software such as Outlook Express. You will need to install email software to use the Scan to E-mail feature of the scanner/All-In-One.
The following email programs are supported with EPSON Event Manager and Windows:
- - Outlook Express 5.x-6.X
- Microsoft Outlook 2000/2002/2003
- Eudora 5.X-
- AOL Communicator
- AOL (only when it is set as the default e-mail client)
- Windows Mail
- When using AOL
When using AOL, set AOL as the default e-mail application. If another application is set as the default e-mail application, it is possible to select AOL from the selection list, but it will not operate properly.
- Predicted Size and Actual Size
Because of JPEG file compression, the predicted size and actual size may differ. Use the predicted size as just one of your criteria.
Limitations:
Note:Stylus SX110/SX115/SX125 users: As your product has a 'Scan to PC' button only, if you want to scan directly to an email you will need to configure the scanner button in Event Manager so that the 'Scan to E-mail' feature is launched when you press the 'Scan to PC' button on the product's control panel.
For more information, see step 6. Check the events assigned to the scanner buttons.
- When using AOL
- Networked All-In-Ones
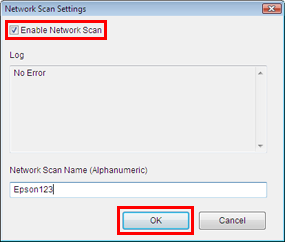
If you are using one of the following network-capable All-In-Ones on a wired (Ethernet) or wireless network, you will need to make sure that the check box beside Enable Network Scan is ticked in the Network Scan Settings dialog. This is located at the bottom of the Button Settings tab. Also check that the IP address in EPSON Scan Settings matches the IP address on the network status sheet.
Applicable models include:
- Stylus Office BX310FN, BX320FW, BX525WD, BX610FW, BX625FWD, BX925FWD
- Stylus SX420W, SX425W, SX510W, SX515W, SX525WD, SX610FW, SX620FW
- Stylus Photo PX710W, PX720WD, PX810FW, PX820FWD
You can also change the Network Scan Name. We recommend setting a unique, recognisable name on each computer that will use the All-In-One e.g. 'MaryPC1', 'Computer1', 'Computer2'. Click OK and close the Button Settings window.
Open the start menu and type 'EPSON Scan Settings' into the 'Start Search' box. Open EPSON Scan Settings and make sure your product is listed in the Select Scanner box and that the IP address in Network Scanner Address matches the product's IP address.
You can check this via the LCD panel in Setup > Network Settings > Confirm Settings or on the network status sheet. For help printing a network status sheet, please see the following Related Article: How do I print a network status sheet?
- If the IP address doesn't match, click on the scanner entry and click Delete then click Add to select and add the scanner again. Click OK to close EPSON Scan Settings.

- Check the events assigned to the scanner buttons
Check what action has been assigned to the scanner buttons. Also make sure that the correct scanner model is selected in the top-right corner of EPSON Event Manager.
For further assistance, see the following Related Article: How do I configure the scanner button for EPSON Event Manager?

- Other checks
If there is no response when the scanner button is pressed, make sure that Epson Scan isn't running otherwise the button may not work properly. Finish the scan, close Epson Scan and try pressing the button again.
Also, in the following situations operation may not be possible until the scanner, software or computer has completed the action:
- The scanner is in the initial movement (starting up).
- The scanner is scanning.
- Epson Event Manager is processing.
- A PDF is being created.
Make sure that the user account in use has sufficient access rights to use software and access the scanner. A limited account will not have the same privileges as a full/administrator account.