My printouts are missing colour and/or black print
If sections or lines in the printout are missing or if the printer does not print any ink onto the paper at all, this could be caused by blocked print head nozzles or old cartridges. However, if ink is printing onto the paper but your printouts are not in colour (e.g. black and white or sepia), this could be as a result of a setting you have applied in your printer software or printing application.
First, print a printer operation check to determine the type of print quality issue and then return to this article and refer to the appropriate section.
Nozzle check result
When the check has printed, compare the printout to the examples below:
| Good nozzle check sample | Poor nozzle check sample |
|---|---|
 |
 |
|
The print head does not need to be cleaned. Continue to follow the steps in this article to troubleshoot the problem. |
The print head needs to be cleaned or the ink cartridges may be old and require replacement. For instructions on checking and cleaning the print head nozzles, see one of the following Related Articles: |
Troubleshooting printout issues
-
Make sure your printer software is not set to use Black Ink Only or Grayscale.
Windows
-
Open the Printers/Printers and Faxes folder. See the following Related Article for help with this step: How to open the Printers or Printers and Faxes folder in Windows.
- Click Start > Settings > Printers. Or:
- Click Start > Control Panel. Double-click Printers, or Printers and Faxes, or Printers and Other Hardware.
- Right-click on your printer icon, left-click on Printing Preferences. Click the Advanced button.
-
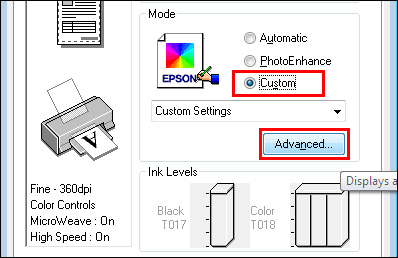
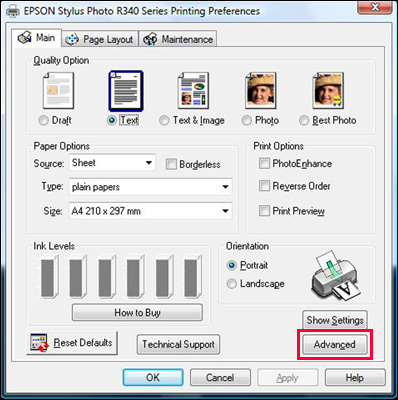
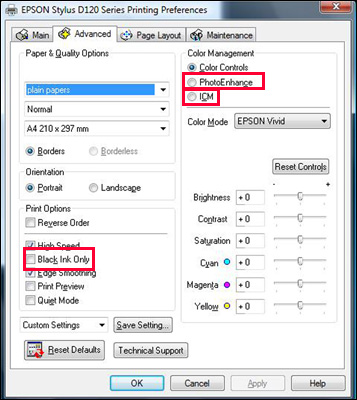
Make sure your printer software is not set to use Black Ink Only. Please see the images below for the location of the Advanced settings within the printer driver.
Figure 1. For some products, access 'Advanced' via the Custom Mode:

Figure 2. For some products, access 'Advanced' via the Main tab:

Figure 3. For some products, access 'Advanced' via a dedicated tab:

Figure 4. Check the following items:

 Note:
Note:For some models the Black Ink Only option is referred to as Grayscale.
Mac OS X
- Open the application you wish to use and click File then Print.
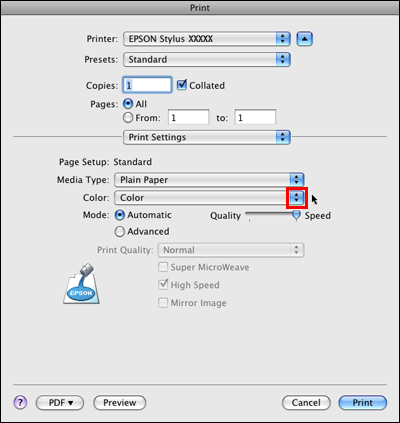
- Select your Epson printer in the list, then click on the pull-down menu headed either with the application name (e.g. TextEdit, iPhoto) or Copies & Pages and select Print Settings. Note: For 10.5/10.6/10.7, you may need to click on the arrow beside the printer name to reveal the advanced settings in the Print dialog.
-
Here you have the option to select either Black or Color. Make sure Color is selected when you proceed to print.

-
Open the Printers/Printers and Faxes folder. See the following Related Article for help with this step: How to open the Printers or Printers and Faxes folder in Windows.
-
Try turning off PhotoEnhance in the printer driver; if you are printing photos with either Epson Easy Photo Print or PhotoQuicker, turn it off in the image correct/advanced settings section of the software. If you are printing without a computer with a product which has an LCD screen and standalone printing function, turn off PhotoEnhance and any image correct settings via the LCD screen menu.
- For Windows, this is accessed via the Advanced section of the printer driver under Color Management.
- For Mac OS X, this is accessed via the Color Management section of the printer driver in the Print dialog.
-
Your printed colours can never exactly match the colours on-screen. However, you can use a Colour Management system to get as close as possible. In Microsoft Windows, try using the ICM setting or in Mac, the ColorSync setting.
- Monitors and printed images display colours in a different gamut: RGB for monitors, and CMYK for printers. In addition, a monitor is transmitting light, whereas a printed document is affected by absorbing and reflecting light which can be further affected by the type of light (e.g. artificial or natural).
